Friday, October 30, 2009

Friends are the Sunshine of Life!

I consider myself very lucky in the fact that I have a wonderful group of friends. Sure there are some that border on the brink of being toxic, but for the most part, they are a pretty good bunch.

There is one particular friend who continually amazes me with her thoughtfulness and generosity. Strangely enough, she is the friend that has the most going on in her life.

I happen to work with this friend, so when I announced that I was pregnant we agreed to set up milestone coffee dates to celebrate the number of days I had left of work until I went on maternity leave. The milestones we set up were at 101 days, 75 days, 50 days, 25 days and then every 5 days until I finish up on the 22nd of January 2010.

At our first coffee milestone, my friend had gotten me a present. Two books - The Disney classic, 101 Dalmations and a book of 101 Quilting Blocks (to compliment the 101 days milestone). While I scolded her for buying me a present, I couldn't help but be touched by her action.

At the 75 day coffee milestone she had gotten me another present (and yes, I did some more scolding). This time it was a laminated poster with 75 things to say to your child to encourage them. I loved it. Rather than putting it away somewhere and forgetting about it, I stuck it up on the inside of the pantry door as soon as I got home and plan on referring to it regularly once the baby is born (and is old enough to understand what I'm actually talking about).

This week we reached the 50 day coffee milestone and yet again, there was another present waiting. This time it was a total of 50 tea bags in the most adorable little tins:

Each tea bag contains really lovely quotes about motherhood or children:


Some of the quotes include:

  • "Savor the smiles and laughter of your children - there is nothing more important"
  • "People who say they sleep like a baby usually don't have one"
  • "The most important thing a father can do for his children is love their mother" (hear, hear!)
  • "Don't worry about varicose weins, pantyhose come in purple"
It is kind gestures like the ones shown by my friend that make me want to strive to become a better person. Sometimes it is just small things to let someone know that you're thinking of them that mean so very much. I am truly blessed to have such a great friend!

Week 25!

25 weeks today! Can you believe it? I certainly can't. We are well over the half way mark now, but no where near the point of reaching the half way mark of actually being ready for the baby.


This week I was sick for a couple of days which left me feeling pretty exhausted. But yesterday I started perking up a bit and I am feeling back to my normal self today. My skin took a bit of a beating though - I had a major pimple explosion and have noticed that my skin is looking a little dry. I think a pamper session might be in order for tonight.

Yesterday I had an appointment with the obstetrician and am pleased to report that the baby is growing nice and strong. While we aren't quite as big as we need to be, there isn't any cause for concern - yay!

Thursday, October 29, 2009

Project #18 - Paint Santa Ornament (Update #2 - Finished)

Finally the Santa ornament is finished! Here he is from the front:


And from the back:


It took a lot longer than expected to finish it off due to my incredibly unsteady hand. Some days were better than others though, so if I felt like I was having an 'off' painting day (eg. painting everything else in sight other than what I wanted to), I would just do another crafty project and leave the painting until the next day.

I thought the painting would be the hardest part, but boy was I wrong! I decided to varnish Santa outside due to the fumes and for some reason (I blame the baby for sucking out part of my brain) I thought it would be best to do this on a small piece of paper in the middle of our gravel driveway.

This would have been fine if I wasn't almost 6 months pregnant with a CRAZY centre of balance. After spraying Santa with a coat of varnish, I went to move around to do the other side and accidently sprayed Santa with a face full of gravel instead. Of course because of the varnish, the gravel stuck to him and I flew into a frenzy. Luckily I was able to remove the gravel and Santa came out relatively unscathed!

*Note to self: Painting plaster moulds is not as therapeutic as it sounds*

Here is a link to the other post on painting the Santa ornament:

Wednesday, October 28, 2009

Saving Challenge : Pram (Update #4)

Our garage sale was scheduled for this weekend but since I have been sick all week *sigh*, it has been pushed back again (til the 14th of November).

Today though, something VERY exciting happened. We received an anonymous donation of $120 towards the pram fund:


Well maybe it wasn't 'anonymous', but it was definitely unexpected. My lovely mummy donated this substantial amount to the fund for fear that her grandchild would be without a fancy set of wheels.

This means that we are now well over half way there and only need a further $242.99! Go team us!

Project #15 - Recipe Book

A while back I decided to make my own fabric by stamping a piece of material. I was lucky enough to pick up a hand carved stamp for a couple of dollars at an import place we visited in Queenscliff one weekend:


The trick to stamping the fabric was to ensure that the right amount of fabric paint was on the stamp before committing it to the design - too much fabric paint and it would cause the stamp design to bleed, not enough fabric paint and the design would hardly be visible on the fabric.

Once the paint had dried I gave the fabric a press with an old hanky to seal in the design and then placed it in my 'fabric stash', only to forget about it! A couple of weeks ago though I had the idea to create a recipe book with a fabric cover. It was then that I remembered my lovely piece of hand stamped fabric.

Using an empty, unlined notebook as my 'recipe book' I carefully made a template for my fabric cover. As the fabric was fairly light, I needed to use a backing fabric and iron on a piece of interfacing to the main fabric piece, so that the turquoise cover of the notebook couldn't be seen through the cover. I used a dark brown fabric for the inside flaps to complement the brown used in the stamped design.

As I was sewing it all together, I got a little inventive and decided that I should also secure a piece of elastic into the inside flap, so that the book can be held open at the chosen page.

Here is a picture of the finished product:


Tuesday, October 27, 2009

Project #6 - Pebble Table Runner (Update #3)

Well tonight I was inspired to do a bit on the table runner since it was sitting on the pool table all ready to go. Once I started, I actually found it quite therapeutic and managed to get about quarter of it complete before my poor little legs got sore:


I swear it doesn't look nearly as 'wonky' in real life although there are definite lumps and bumps across it due to the inconsistencies within the pebbles themselves. 'Character' I think they call it!

I am finding the liquid nails to hold up to it's side of the deal so far (well, better than the hot glue gun anyway!) but have found it quite testing, since it keeps squirting out the sides of the pebbles as I push them down (see below):


There are a couple of things I can do about this 'explosion' of liquid nails:
  1. Ignore it
  2. Try harder to not put so much liquid nails on
  3. Paint the liquid nails explosions with black paint once the runner is completed
Currently I am opting for a combination of options 1 and 2 and will run with option 3 if I find that the explosions really bug me once it's been sitting there for a week.

I will keep working on this over the next couple of days and post a picture once complete.

Here are links to previous posts on the table runner:

Monday, October 26, 2009

Crafty Weekend Failure

This past weekend I had plans, big plans... but when it came to the execution part well, let's just say, not much happened. My parents were away at a wedding in Albury-Wodonga, so I was given the task of 'baby-sitting' my brothers and sisters. I thought this would have made for a perfect weekend of getting things done, but I guess I was wrong.

Friday night started off with enthusiasm though. I cut up some old towels to re-engineer into hooded towels for the baby, I cut out the fabric to make the cover for my recipe book, I sorted out a bunch of photos to be stored in a photo box and I continued with painting the Santa ornament (until I couldn't stand all of the mistakes being made due to the poor lighting at mum's house). I did, however, manage to completely finish one of my projects - the knitted bonnets.

I must admit that I definitely was not so enthusiastic about my craft projects on Saturday, but for good reason. The weather was superb and Matty's parents came up to finish putting the wire around the deck on our house (yay!):


Rather than work on craft projects, I chose to sit outside in a deck chair and supervise the installation of the wire. The only craft related activities I accomplished for the day, was the purchasing of the fabric for the outside of the hooded towels and the securing of a full tube of liquid nails for use in the table runner project.

Sunday was essentially a write-off as well. I felt pretty crappy after having had two nights of VERY ordinary sleep at my parents house. I cut out the outside material for the hooded towels and continued on with the painting of my Santa, but very little else. I was pretty disappointed with my efforts, but at least I managed to prepare a fair amount of stuff for some upcoming projects.

Project #10 - Knitted Bonnets

A while back, after having knitted scarves and blanket squares for a while, I decided I needed a knitting challenge. I figured I might as well have a go at making some baby things as they would be small and I could also use them as gifts if they turned out alright.

I fell in love with a bonnet pattern I found in a baby pattern book, so i started knitting those. Unfortunately I strongly dislike working with wool in the summer months, so I put them aside when it got hot and subsequently forgot about them!

I dug them out of the knitting bag a couple of weeks back and finished them off, but I still needed to stitch the row of lazy daisies on the front and put the ribbon ties on. Here is a picture of them completed:


Unfortunately, there doesn't seem to be much of a demand for hand knitted goods any more, so I am not sure what I am actually going to do with them. We do have a friend due in two weeks who I think would appreciate them, so I may give them to her as a gift (providing she gets the girl she is praying for!)

Friday, October 23, 2009

Project #18 - Paint Santa Ornament

Since I couldn't get to Bunnings to get the liquid nails for the table runner, I made a start on painting the Santa my friend Tristan gave to me last year instead.


The Santa is made out of plaster and was purchased at The Plaster Fun House. Usually you paint the plaster ornaments in the store and they put a varnish over it before you leave. While I admit that it is fun to spend hours there painting an ornament, there are a couple of problems with the setup at The Plaster Fun House that mainly stem from the fact that the establishment is designed primarily for kids:
  • The chairs are tiny and give you back ache after a while
  • All the paints are watered down and contain a 'rainbow of colours' in every pot
  • While they sell coffee in various forms they are no means a coffee house. I suggest taking your own thermos unless you like drinking something that tastes like muddy water
  • There are plenty of temper tantrums and kids crying over paint colours and ornaments, so wear earplugs.
As I was given this ornament to paint at home, I didn't experience any of the above problems. I also didn't need to use acrylic paints either as Matty used to paint Warhammer 40k miniatures, so I had an array of top quality painting colours available to me for use. With colours such as 'snot green', 'gore red', 'bleached bone' and 'skull white', who would want to use boring acrylic colours:

These paints (while they are more expensive than acrylic at around $6 a pot) cover incredibly well. Due to the ornament being made out of plaster, there were a lot of imperfections in the surface, however, so I had to 'over paint' the lines to make sure that all surfaces were painted. Here is a picture of santa before he got eyeballs (scary, huh!):

To say that painting the ornament was fiddly would be an understatement. There were many times where I almost gave up hope. I still have not finished it, as there are parts that need to be touched up, but here are some pictures of what it currently looks like:


and here is a picture of the toys in Santa's sack (my favourite part of the ornament):


Once I have touched it up and varnished it, I will post another picture of it completed (hopefully that will be this weekend!)

Here is a link to the other post on painting the Santa ornament:

Week 24!

Well, the jeans still fit and I have a sneaking suspicion they will fit for at least another week or two.


I must admit I am a bit disappointed with this weeks belly shot as I felt like I was MUCH bigger earlier in the week. Last night, however, I was awoken at 2am with horrific stomach cramps that were so bad that I couldn't even stretch myself out straight in bed. I got up quietly, as I thought Matty would freak out if he knew how much pain I was in, and went to the toilet only to find that I had the WORST case of wind ever recorded in history! Needless to say, my tummy deflated somewhat over the course of the next 4 hours *sigh*.

This past week I have, yet again, been amazed by the fact that people think they can comment freely on your body just because you are pregnant. Some of the comments directed at me this week include "So, how are things going, Tubby?" and "Oooh, you're getting fat". I feel like giving THEM tips on how they can reduce the flab around their mid-section or how they could tone up their 'nanna arms', but alas, I keep my comments to myself.

I am looking forward to the next week, as I have an obstetrician appointment so will get to hear Darth's heartbeat and check my fundal height and other fun things like that. I can't wait!

Thursday, October 22, 2009

A very sad story indeed...

Today I am mourning the (hopefully temporary) loss of my elliptical cross trainer....

A few months ago we noticed that it was becoming noisier than usual. We stopped being able to use it while watching TV because the noise was just so horrendous that the volume on the stereo had to be cranked to it's maximum capacity and even then, you could only just hear what was being said!

While I was using it on Tuesday the noise mysteriously stopped. I thought that was a little bit weird, but I hung on to the handles for dear life and prayed that all was ok.

Well it was....until the methodical clunking noise started.

Scared out of my wits, I jumped off and figured that the belt had just slipped off.... Boy was I wrong! When we took it apart, we found that metal holding the arm that turns the wheels around had snapped (can you believe it!):


We are hoping that we will be able to have someone weld the metal bits back together, but we can't seem to find a tool to get the wheel casing off.

In the meantime, I have to find another means of getting my daily exercise. Luckily my aerobic step arrived in the mail yesterday!

Wednesday, October 21, 2009

Project #6 - Pebble Table Runner (Update #2)

Last night I started putting a few of the pebbles onto the table runner to see how they would stick. Having never used a hot glue gun before. I underestimated how much power it had and how quickly it would churn through the glue.

I would strongly recommend mapping out where you are going to put some of the pebbles before you start adhering them, rather than just placing them one by one. I only did a handful last night to see how they would stick:


While most of the pebbles stuck fairly well by placing glue on both the underside of the pebble and the mat itself, some of them did come loose after giving them a little jiggle. Luckily one of the lovely ladies at over at the Simple Savings forum had taken an interest in the table runner and had suggested the use of liquid nails to adhere the pebbles rather than the hot glue gun. So today we are off to the new Bunnings store to stock up on some of that!

Here is the link to the previous post for the Pebble Table Runner:

Saving Challenge : Pram (Update #3)

Another $16 raised successfully through eBay sales, which I am quite excited about. It pushes the savings total up to 35% of the amount that we need to buy the pram.


We were planning on holding the garage sale this weekend but due to a combination of bad weather and other events, we have had to reschedule temporarily so that Matty's dad can come up and finish off the wire around our deck instead.

I am a little torn with whether or not to list more stuff on ebay, given that there will be at least a minimum of 10 days until we can hold the garage sale. So long as we have the money raised by December I will be pretty happy and we look well on our way to getting there before then, so maybe I will hold off for now.


Here are the links to previous posts regarding the Saving Challenge for the pram:

Tuesday, October 20, 2009

Project List!

A very dear friend of mine suggested that I should put up a list of all of the projects I have on the go, so here are the things I can think of (I will add to it over the coming weeks). The projects that are underway have links to the associated post:
  1. Pram Blanket (finished)
  2. Christmas Traditions book (finished)
  3. Baby Shoes and Bibs (finished)
  4. Modern Cloth Nappies
  5. Labels for containers (finished)
  6. Pebble Table Runner (finished)
  7. Hooded Towels (finished)
  8. Cot Quilt (finished)
  9. Memory box
  10. Knitted bonnets (finished)
  11. Dolls house (from kit)
  12. Nursery curtains (finished)
  13. Scrapbook Wedding (2006)
  14. Scrapbook Europe Trip (1999-2000)
  15. Recipe book (finished)
  16. Owl Mobile (finished)
  17. Tablecloth and runner (from existing table cloth) (finished)
  18. Paint Santa Ornament (finished)
  19. Wet bags (for dirty nappies)
  20. Cot Valance (finished)
  21. Artwork for bathroom wall
  22. Nappy Covers (finished)
  23. Tilt scale photographs
  24. Maternity Skirt Refashion (finished)
  25. Bibs for Isabella! (finished)
  26. Muslin Wrap (finished)
  27. Toy box seat topper (finished)
  28. Play mats (x2)
  29. High chair cushions (Spare set)
  30. Breastfeeding cover (finished)
  31. Maternity Top (finished)
  32. Reusable Sandwich bags
  33. Christmas Cards (finished)
  34. Breast pads (finished)
  35. Crayon Rolls (finished)
  36. Bunting flags (finished)
  37. Lamp for the Nursery (finished)
  38. Cover for change table mat (finished)
  39. Miniature Bunting Flags for Window (finished)
  40. Cushion for rocking chair (finished)

Project #3 - Baby Shoes & Bibs (Update #2 - Finished)

I got home too late from dinner last night to resume work on the table runner, so instead I put the finishing touches on my bib and baby shoes sets. I am really pleased with how they turned out, especially the bibs.


The most time consuming part of the process was putting the finishing touches on the shoes. Both the inner sole and the label on the back needed to be hand stitched on, however I am thinking that I may be able to machine sew the label on prior to sewing the shoes together next time. Here is a picture of the finished shoes:


For the bibs, I used a free pattern available on the Chickpea Sewing Studio blog. The pattern is a nice shape but is only really suitable for babies who are 0-3 months old. I have made my own pattern for a larger bib, but have not tried it out yet. Here is a picture of some of the Chickpea Studio bibs using Alexander Henry's 3D Zoo and Michael Miller's Dick and Jane fabrics:


The range of available quilting fabrics is really quite spectacular, however they are very expensive (between $18 and $22 a metre). Here are some more bibs using some quilting fabrics I picked up in Geelong:


I am now thinking of making some matching burp cloths to complete the set and may even look to sell some of these sets on Etsy or at local markets in the future - it depends if I can find the motivation to do so!

Here is a link to the other post on baby shoes and bibs:

Monday, October 19, 2009

Project #6 - Pebble Table Runner

A while back I decided that I wanted to buy a table runner for the pool table, as it has a nice wooden cover that sits over the top but it is a little bit dull. I found a spectacular looking table runner made out of pebbles at the local garden shop and was pleased to see that it had been marked as '50% off'! As I was admiring it, the sales lady approached and advised that it was on sale and had been reduced to only $150! I told her she was dreamin' and decided right then and there that I would just make one myself.

Here are the supplies I plan on using: gutter guard, a 10kg bag of pebbles (both from Bunnings), non-slip matting (from Clarke Rubber), felt (from my craft stash) and a glue gun (courtesy of mum). All up, I am estimating this will cost me between $20-$30 to make.

I am not really sure what I am doing, but my approach is going to be as follows (fingers crossed it works):
  • Spray paint gutter guard black (it's currently brown).
  • Glue gutter guard onto non-slip matting as I figure this will give the pebbles something to hold onto.
  • Glue felt onto underside of non-slip matting (so that it can be pushed around the pool table easily if I need to move it).
  • Hot glue gun pebbles onto gutter guard/non-slip matting.
Sound easy, hey!

I aimed to start this yesterday but didn't get very far as I was tired and grumpy! Matty kindly got a start on it for me and spray painted the gutter guard black and adhered it to my non slip matting.
When I went out to the shed this morning, I found it squashed under numerous bits of wood and about 150kgs of weights... but boy was it straight and well adhered! Good job Matty!

Below is a sneak-peak of part of the table runner (currently unadhered):

I hope to start putting some of the pebbles on with glue tonight, but we will have to see how I go. These things take time and a lot of procrastination!

Here are the links to other posts on the pebble table runner:

Saturday, October 17, 2009

Project #5 - Labels

When we found out I was pregnant, we knew that the room holding all of my craft items would need to be packed up and stored so it could be turned into a nursery. That was easy enough - I cleaned out the linen press, got some nice plastic storage containers and managed to organise it to a degree. The only problem was that I couldn't really tell what was in each box easily, so I decided to label them all (isn't it pretty, and yes, very anal retentive!):

I also thought I should label the containers in the pantry since I have lost count of the number of times I've baked using plain flour instead of self raising flour, for the simple fact the canisters were not labeled!

Well then I was on a role... I had a sudden urge to label everything in sight...

Ahhh.. isn't he adorable! I'm pretty sure there wouldn't be all that many husbands that would be so willing to participate in silly antics such as this.

In tomorrow's blog I'm going to be starting a new project and perhaps finishing off the baby bibs I've been promising for a while! I'm so excited about the new project. It's been an idea of mine for about a year now, but I'm not telling you what it is... so you'll have to drop by and find out yourself!

Friday, October 16, 2009

23 Weeks!

Today I am in slight disbelief that I am 23 weeks pregnant! Where on earth has the time gone and will the coming 17 weeks go just as fast?!?!

I'm pleased to report that I can still fit into my size 10 jeans but I feel that might not be the case next week, as they are starting to feel a little more tight across the waist line than they were last week. Here is a belly shot taken this morning before work:

According to numerous *experts* in the field, I'll have a 'baby explosion' within the next week or two and I'll feel like I'm the size of a house. I didn't feel the need to point out that these supposed experts have been saying that since I was 17 weeks pregnant and we're yet to see this explosion! You will notice, however, that I have chunked up a fair bit since my 20 week photo. Still just look fat though, not pregnant!

Overall I'm feeling pretty good. I was horrifically sick earlier in the week, but feeling a lot better now. Perhaps that is because the weekend is drawing near!

Darth's kicks are getting stronger and stronger with every day and the little monkey has taken to kicking me right where it hurts - on the scar from where I had my tumour removed. Matty has a stern word to Darth about this behaviour (via my belly button) but unfortunately Darth really isn't interested in listening to his daddy! It was worth a shot though!

Wednesday, October 14, 2009

Recipe : Honey Joys

Along with my other creative talents, I also bake. I actually bake quite a lot when I have ingredients on hand. I like the idea of Matty and I having nice, fresh, healthy and cheap snacks brought from home, rather than us spending money on processed junk from the work cafeteria.

Last night I had the urge to bake, but I also had a bit of a problem on my hands - I had no milk or eggs (which are two of the ingredients I would class as 'baking staples').

After a bit of a hunt through the pantry I found that I had about 1/2 a cup of SR flour, 1/4 of a cup of plain flour, some jam, some honey, a bit of sugar, a tub and a half of butter, 1/2 a loaf of bread, a couple of weetbix and 1/2 a box of cornflakes. Not really inspiring ingredients, but I was determined to make something out of what we had. *Note to self: You REALLY need to do some grocery shopping!*

First I considered making up a damper, but I've been having such horrific reflux after eating bread that I decided against that. Instead, I realised I had the ingredients for an infamous classic - the honey joy (or 'cornflake jewels' which is what Matty calls them).

While I did get a recipe from off the web, I altered it a little bit and came up with the following:

Ingredients:
2 tsbspn honey
1/3 cup sugar
90gms butter
4 cups cornflakes

Method:
1. Preheat oven to 150 degrees
2. Place cornflakes into a large bowl
3. In a saucepan, melt the butter. Add the honey and sugar and stir continuously until sugar is dissolved (the mixture will start to boil and will go kind of 'fluffy')
4. Remove from mixture from the heat and pour immediately into the cornflakes. Combine well
5. Spoon mixture into patty pans and bake for 10 minutes or until golden brown.

Mmmmmmm.... sugary, honey goodness!

Tuesday, October 13, 2009

Saving Challenge : Pram (Update #2)

A couple more items finished on eBay today and I am pleased to report that an additional $46.50 has been raised towards the Pram Savings Fund.

While I had hoped to be around 50% of the way through raising the funds by now, I must say that I am quite impressed that we have sold this much junk! Things that we didn't expect to sell have sold, and other things that we were expecting to sell have sold for more than we expected.

The next step is to organise a garage sale, which we are hoping to hold on the 24th of this month depending on the weather (which changes from minute to minute at the moment). In the mean time, I think I might relist some of the stuff on ebay and see if we can't squeeze some more funds from that. There are still a couple of auctions finishing tomorrow, but I'm not holding out much hope for those items selling.

Monday, October 12, 2009

Project #4 - Modern Cloth Nappy

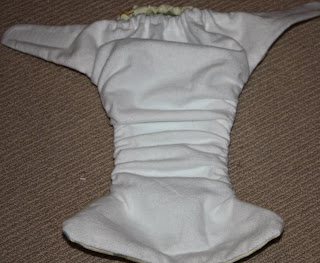
Well, as if I didn't have enough projects on the go at the moment, I decided to tackle yet another one - the sewing of a modern cloth nappy. For some time I have been struggling to decide whether I should have a go at making them, or whether I should just save myself the hassle and buy them. At between $20 and $40 a nappy, I thought I had better give it a crack before throwing in the towel. I must say, I am glad I did as I found it to be much easier than anticipated. With a bit of tweaking, I am fairly confident our baby will have a nice and snug fitting nappy. Here is a picture of the one I made today just using scrap materials from around the house:

After investigating the options for free patterns, I decided to go with the Wee Weka pocket nappy. While it was relatively straight forward, I felt that the instructions could have been a bit clearer as I had to re-read them a couple of times before it all made sense.

For the purpose of this trial nappy, I used a cotton fabric for the outer later, ripstop for the waterproof layer and flannelette for the inside layer. I have no idea at all whether or not this nappy would be waterproof if it actually needed to be used, but it looks good.. and that's all that matters at the moment!

For the soaker I cut up a piece of material my sister 'acquired' for me. It is one of those pads you put down on mattresses for bed wetters. Apparently it pulls the moisture away from the skin, which is exactly what we want! I simply cut a strip off the mat and overlocked around the edges - nice and easy (see below)!

After making just the single nappy, I have decided I will do a few things differently next time:

1. I will use snaps rather than velcro - The rise on this nappy is quite high, so in order to make it suitable for newborns, I feel that snaps would be a better option (they also look prettier).

2. I will overlock the pieces together - Because it is a pocket nappy, you can see inside...and the edges in there look a little rough. My sewing ability leaves a bit to be desired also, so overlocking would give it extra strength.

3. I will sew another seam around the outside - I had a look at some of the nappies people have made on flickr and the ones with a seam sewn approximately 2-3mm around the outside of the nappy look more 'polished' than those that don't.

4. I will sew a soaker pad inside the nappy - I like the idea of being able to stuff as many soaker pads inside the nappy depending on how much your baby wets, but lets face it - it's always going to need at least one, so I'm going to sew it in there. While this will affect the drying time, I believe that won't cause too much of a problem.

5. I will find out how much leg elastic is required - Can you believe that the pattern doesn't state how much elastic is required for around the leg! I am going to find out and let you all know! ETA: 16cms of leg elastic is required!

Friday, October 9, 2009

22 Weeks!

At 22 weeks I have started to notice that my breathing has changed, due largely (I think) to nasal congestion. It makes me feel like I am the most unfittest person on the planet.

I am pretty sure that when I feel like I can hardly breathe, the baby grows to at least twice it's size so that not only do I feel unfit, I also feel like I'm the size of a house! Anyway, here is the belly shot from this morning:


You may have noticed that I still look like I'm half asleep. This is because I have been having the BEST sleep of my life lately. So good in fact, that I'm sleeping through the alarm most days and then waking up feeling incredibly groggy. Hmmm, perhaps Matty has been slipping me something of a night. *Note to self: Don't accept any beverages or food Matty offers me*

Thursday, October 8, 2009

Saving Challenge : Pram (Update #1)

Well yesterday I had a little bit of success on my ebay auctions. I managed to sell numerous pieces of fabric, some books, a plush talking Kenny doll and some Brita water cartridge filters that I bought by mistake a couple of years back. This has had a positive effect on the pram savings fund, but we still need more!

Unfortunately none of the 21 auctions ending on eBay this morning sold, so the next step in raising some funds is to organise a garage sale. I did take advantage of a 'no insertion fee' promotion that eBay had on to celebrate their 10th birthday so those auctions will be finishing later this week. Hopefully that yields some more sales!

Wednesday, October 7, 2009

Project #3 - Baby Shoes & Bibs

A while ago I started making baby shoes based on a pattern in Amy Butler's "Little Stitches for Little Ones" pattern book.


I managed to get 6 pairs of shoes sewn together before I lost the drive to continue. These shoes have been sitting on my bookcase for around 4 months now, waiting to have some soles slip stitched in so it's time to get some motivation and finish these off!


On a side note, the Amy Butler pattern book is full of soooo many cute things. I highly recommend this pattern book, but must stress that the instructions (in my opinion) are not written clearly enough for beginner sewers. I would suggest that this book is best for intermediate to advanced level sewers.

Once the shoes are finished (hopefully by tomorrow night), I'll be onto making matching bibs (and might even put up a tutorial if I'm feeling inspired).

Oh, I failed to mention I also made some cute little tags for the back of the shoes, which say "Boehm * Baby".


Here is the link to the other post on baby shoes and bibs:

Tuesday, October 6, 2009

Saving Challenge : Pram

I have this vision... of buying the baby's pram using only money generated from the sale of items lying around the house (in true Simple Savings form). It's not that we can't afford to buy the pram, but we do have a lot of crap lying around that I'd like to get rid of and this seems like a good opportunity to do just that. The pram I'm looking to buy is the Valco Rebel Q which I can pick up for around the $560 mark.

In order to meet this goal I have listed numerous books, clothes, bric-a-brac and some artwork I made on eBay. The auctions are due to finish over the next couple of days and whatever doesn't sell will go into the shed ready for a garage sale that I plan on holding within the next couple of weeks.

Lets hope some of it sells! I will keep you updated on the progress.

Monday, October 5, 2009

21 + 3 Weeks!

Well I was a bit lazy last week and didn't take my 21 week photo on Friday, so I took it this morning at 21 weeks and 3 days.


I must say that I am feeling pretty good but am getting a bit sick of people asking me how I am all the time (and it's only going to get worse as I get bigger *sigh*). I am still able to sleep on my tummy and not feel like I'm squashing Darth, which is quite an accomplishment, and am managing to do at least some exercise on every day of the week. I just hope I can keep it up until the birth!

The shocking realisation that we have something on every weekend for the next 6 or 7 weeks has sent me into a bit of a frenzy - worrying that I won't have enough time to get the nursery set up or the Christmas and Birthday shopping done, so this is the week to start to get organised. I have been making up a shopping list and will try to get it all done in one hit. I guess it is a bit of a blessing in disguise, because come December I am pretty sure I am not going to be wanting to waddle around in the heat shopping.

Well must away. Will post tomorrow with the progress on my baby shoes!

Friday, October 2, 2009

Project #1 - Pram Blanket (Update #3 - Finished)

Hooray! The blanket is finally finished!

I initially thought that the knitting of the squares would be the only really time consuming part - boy was I wrong. It took about 4 hours to sew the thing together and then a further 3 hours to applique the owl on. But it does look pretty good, if I may say so myself. Now that the blanket is out of the way, I'm going to make a start on yet another unfinished project - some baby shoes!


Here are the links to the other posts on the pram blanket: