skip to main |
skip to sidebar
Well as promised, I am back with pictures of my finished scarf. Here is a close up of the detail. It isn't perfect, but I think that's the whole point!
 And, here is a picture of me wearing it:
 It stinks to high heaven due to the fabric paint so it really needs a good wash, then I'll have a bit of a think about whether I'm brave enough to wear it out in public lol.
Gosh, I don't look too bad for only having 3 hours of sleep last night, hey!
Remember last week when I made the military hat out of my old coat and I said that I was also working on another project that used up the remainder of the coat? Well here is - a scarf..and here is how to make it:
First cut around 60 4" x 4" squares from your material. Note: This scarf is RIDICULOUSLY long (I'm talking about 6 metres) but I think it is necessary so that it sits nice when finished. Once you have the squares, pin them together by placing the top point of one square in the middle of the preceding square, like this:
 Next, run a wide zig-zag stitch down the middle:
 Before you know it you're done:
 Now, I would have taken a picture of me wearing it had I remembered too, but I didn't... and it no longer looks like it does in the picture above. The reason for this, is that I decided it was a tad too boring (like pretty much every other piece of clothing I own), so I challenged myself to brighten it up a bit.
So, in my usual fashion, I did a bit of research on ways to add a bit of 'pizazz' to this thing. I spoke to numerous people and looked at many websites and everything pointed to the use of buttons as a way to add some life to it. But THEN I saw this tutorial on Alisa Burke's blog. When I saw that Cheri over at I am Momma hear me roar had a crack at it too, I figured I might as well apply the same principles they did on the shoes, to my scarf.
So, first I used a mixture of fabric fixative and acrylic paints to create my 'splotches' and then I used a black fabric paint pen to fill in the lines:
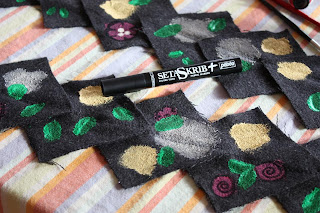 I am still putting all the lines on (6 metres of scarf remember people!) but here is a sneak peak of how it's looking so far:
 The question now is "Am I going to have the guts to wear it out??" lol
I have been holding onto my old coat for a while now, simply because I like the colour and material it is made out of.
When I say a 'while', I actually mean a couple of years. You see, it takes me a while to get the confidence to do things... but Friday night when Matty went to Geelong to see a movie, I bit the bullet and cut up the coat. So, what did I make out of the coat you ask? Well I made two things, but today I am going to show you the Military Hat I made using Amy Butler's pattern from her book "Little Stitches for Little Ones".
You may remember that I made the shoes from this book also. Well, they were a little small. Actually, her 'newborn' size were more suited to premmie babies in my opinion. I ended up giving a couple of pairs to a baby who was in the special care nursery when our son was born.
Anyway, knowing that her patterns tend to err on the smallish size, I decided to make the hat in the 6-9 month size. Boy am I glad I did, as it only just fits. I am also glad that I decided to take a bit off the front bill as it would have been massive (I cut about an inch off).
Here is a picture of the finished hat:
 I must say that the problems with the sizing has really put me off making anything else from the book, which is a shame because there is some really nice things in there.
I will post the other item I made out of the coat later in the week once it's finished.
 And, here is a picture of me wearing it:
 It stinks to high heaven due to the fabric paint so it really needs a good wash, then I'll have a bit of a think about whether I'm brave enough to wear it out in public lol.


