Showing posts with label Tutorials. Show all posts

Thursday, July 1, 2010

Tutorial : Afternoon Tea Keeper

Last week I got creative and turned a CD spindle (you know the things your blank CD's or DVD's come on) into an afternoon tea keeper:


Here are the steps to help you make your own:

You will Need:

An empty CD/DVD Spindle
Scrapbooking paper
Mod Podge
Small hacksaw
A file
A pair of pliers
A decorative doorknob
Ribbon
A clamp

Instructions:

Find an empty CD/DVD spindle:


Take the two pieces apart and saw off the 'pole' in the base of the spindle, using a small hacksaw:

File down the rough bits caused by filing off the pole, so it becomes flush with the base:

Next, drill a hole in the top of the lid of the spindle which is large enough to get the screw of your doorknob through. It is important that this hole is drilled (and drilled slowly) as other methods of putting a hole in the lid are likely to result in the lid cracking, like this:

Take all of the pieces of your doorknob and lay them out. I picked up this beauty for a whopping $4:

Attach the knob loosely to the lid of your spindle. You need to do this to see whether the screw for the doorknob is abnormally long. If it is, it is likely to protrude into your afternoon tea so we need to cut the screw down a bit. If the screw you have for your doorknob is short, skip the next step.

Clamp the screw down to a surface that won't move and cut the appropriate amount from your screw using the small hacksaw:

Secure your doorknob to the lid of your spindle using a pair of pliers. You will need to make sure that it is tightened exceptionally well to ensure that it doesn't come undone when you are opening and closing the finished afternoon tea keeper:


Next, trace a circle onto the back of your scrapbooking paer, using the base of the spindle as a guide:


Cut out the circle and trim until it fits inside the base. Apply mod podge to the base of your spindle:


Place your cicle of scrapbooking paper on top of the Mod Podge. Use the edge of a card from your purse to smooth out any air bubbles:


Embellish the lid of the spindle using ribbon, like so:


And you're done!

The afternoon tea keeper is perfect for holding approximately 8 biscuits:


Or perhaps a delicious cupcake:


The coolest part about using a CD/DVD spindle is this:

It tells you how to lock and unlock it, so there is no need to worry that your afternoon tea will fall out while trying to operate it.

Wednesday, June 16, 2010

Tutorial : Onesie to Long Sleeved T-Shirt

I picked up this onesie for $3 a couple of months ago, simply because Matty luuurrvvees Kiss:


Quite clearly it is a onesie designed for wear in the Summer and since it's well under 10 degrees most days here at the moment, Little Snicker isn't getting much wear out of it. With that in mind, I decided to turn it into a long sleeved t-shirt.

Here's how I did it...and it really isn't as hard as it might seem!

You will need:

A short sleeved onesie (to make into the t-shirt)
A long sleeved onesie (to use as a guide for the sleeves)
An old adults tshirt
A ruler
An air erasable marker (or tailor's chalk)
Some Pins
A Sewing machine
Cotton
A pair of scissors

Instructions:

Take your onesie and lay it out flat. Using your air erasable marker, rule a line directly above the top of the leg holes:

Cut along this line to separate the two pieces. You can discard the bottom part of the onesie as we no longer need it.

Take your long sleeved onesie and lay it out under the onesie you are making into a t-shirt, like so:

This next step is a little tricky to explain, so let me tell you a few things first:

  • The bottom hemmed edge of the adult's t-shirt forms the long sleeved onesie's cuff, so there is no need for a seam allowance on that end (and it means that we cut down on the amount of sewing we need to do)
  • The long sleeved onesie's sleeve is pretty much symmetrical, so it doesn't matter that in the picture below it looks as though the seam of the sleeve we'll be sewing will be on the top. We can just flip it over and it won't effect the end product.
  • The long sleeved onesie I am using has sleeves wider than the opening of my short sleeved onesie, so I haven't added a seam allowance. You may need to add a seam allowance depending on the width of your long sleeved onesie's sleeve.
  • You need to fold your adult's t-shirt in such a way that ensures you are not using the t-shirt's side seam in any way. If you include that seam where you're going to cut, you will essentially end up with two seams on your sleeve (the seam on the side of the adults t-shirt and the seam that you will sew to complete your sleeve).
Ok, did all that make sense? I sure hope so!

Once you've got your adult's t-shirt folded right, place under your long sleeved onesie (with the edge of your onesie's sleeve against the bottom hem of your t-shirt) and make a mark on the t-shirt to the left of the onesie band, like so (you may need to enlarge the image to see where I've marked):


Next, mark out the shape of your sleeve:


And then cut it out:

Unfold your sleeve and serge down the long edge (the edge opposite to the existing t-shirt seam) so that it doesn't unravel or fray. I'm too lazy to get out the serger, so I just used the serger stitch on my sewing machine:

Next, fold the sleeve back together with the right sides together and serge along the edge to complete the sleeve. I also run a straight stitch down this side just to ensure it's secure:


Next, turn your sleeve in the right way and pin to your onesie. Ensure that the seam on your sleeve and the seam under the arm of your onesie match up as best as possible:

Using a straight stitch, carefully sew the sleeve on using the existing seam (or seams in this case) on the onesie as a guide:


You should end up with a sleeve that looks like the one below. Repeat the process to make a second sleeve:

Next, run a serger stitch along the unfinished bottom edge of your onesie:


Fold the serged edge of the tshirt up approximately 1/4 of an inch and pin:

Run a double topstitch around the edge to secure:


Once you've done all that, you've finished!

Here is a picture of Little Snicker wearing his long sleeved onesie t-shirt!

I'm pretty sure he's saying something along the lines of "Thanks mum for making my onesie into an awesome long sleeved t-shirt".... but I could be wrong lol!

Wednesday, May 26, 2010

Tutorial : Using Watercolour Pencils to Make Cards

Today I needed to make some cards, so I thought I would make a tutorial to show you an easy way to do just that using watercolour pencils.

Anyway, back to the cards... Depending on how detailed your design is, it will take you between 10 - 30 minutes to make.


You will need:

Watercolour paper (It is sold in a pad of around 10 sheets in art supply shops). You can use ordinary card, but if you use too much water when you're painting then it will wrinkle.
Watercolour pencils. These are pencils specially designed to get wet. You can get these from an art supply shop also.
Tracing paper
A Pencil
A fineliner
A fine paintbrush
A glass of water
A piece of plain white paper (for drawing your design on)

Instructions:

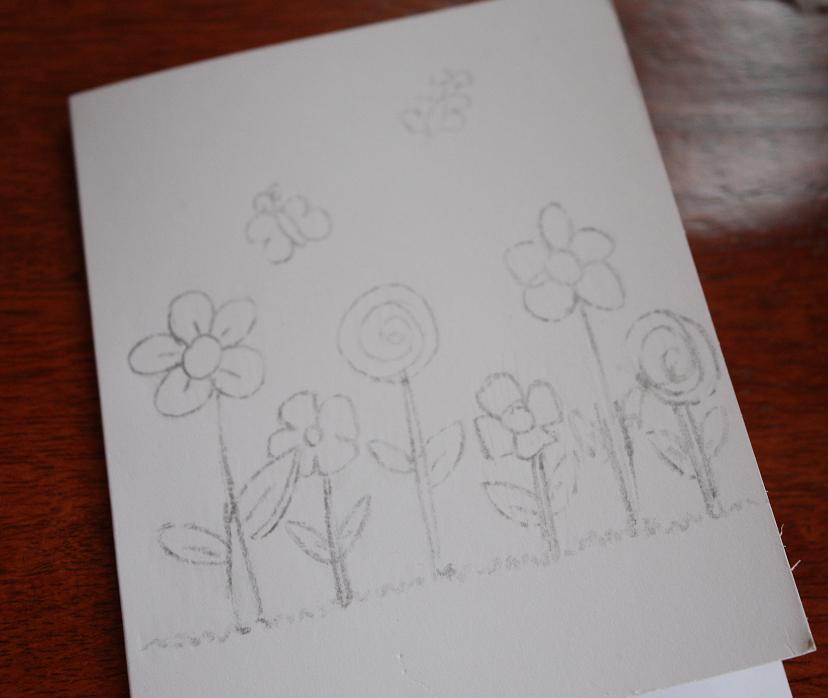
Start by drawing the design you want onto your piece of plain white paper. I suggest folding your paper to the size the front of your card will be. This will ensure that your design will fit just right:


Next, trace your design with a pencil onto your tracing paper:


Turn your piece of tracing paper over and copy the design. This will ensure that when you complete the next step, your design is the right way around:


Take your piece of Watercolour paper and fold it in half to make the card. Turn your piece of tracing paper over and line up the design onto the front of your card. Colour over all of your traced lines heavily, like so:


Once complete, your design will appear lightly on the front of your card:


Next, take your watercolour pencils and roughly colour around the edges of all sections of your design. Remember that the more colour you have, the more 'paint' you will have in the next step:


Take your paint brush and dip it into the water. Paint over the sections that you have coloured, making sure you clean the brush between each colour:

and keep going....


Until you are finished:


It is about this time that I think how terrible my card is turning out and makes me realise that I am certainly no artist. BUT KEEP GOING.. I promise it does turn out alright!

You will need to wait for the card to dry. I usually bust out the hair dryer or sit the card over the central heating vent to speed this part up. Once dry, take your fineliner and draw around the outline of your finished design. Like this:


See, I told you it would all be ok.

Obviously you can cut down on the time the card takes to make by drawing your design straight onto the card with your watercolour pencils. Below is a picture of a card I completed by doing just that:


Better yet, there is no reason why your kids can't help out with this. Why not draw the design and have them paint it for you!

Thursday, May 20, 2010

Tutorial : Ribbon Storage Reels

Today I created some ribbon storage reels as I need them for tomorrow's craft space revamp project.

I seem to have an abundance of ribbons that I have acquired from various sources (usually presents), that are just floating around in a box labelled 'ribbons':


Usually I don't need to delve into the ribbon box too often as there really isn't anything super impressive in there, but I have decided that I am going to start collecting more pretty ribbons for use in my projects.

With that in mind, I need a better storage solution (make sure you pop in tomorrow to see what I'm going to be using to store these ribbons in!)

Anyway, enough chit chat.. lets make some ribbon storage reels.

You Will Need:


Empty toilet rolls
Thin cardboard (an empty soft drink box will work good)
A ruler
A pencil
A pair of scissors
A hot glue gun
A 'circle' template or something circular that you can trace around
Sticky tape

Instructions:

First, cut your toilet roll lengthwise:

Next, lay the toilet roll flat. Measure the width of the ribbon you want to store and rule lines slightly further apart than the width of your ribbon.


Next, cut along your ruled lines to create strips:


Tape the ends of your strips together so that they become circular again:


Take your 'circle' template or the circular item you are going to trace around and draw circles on to your thin cardboard. Your circles will need to be roughly 1-2 cms larger than the diametre of your toilet roll:

Cut out these circles:


Place your toilet roll circle in the middle of the circles you have just cut out and trace around it. This will be your guide as to where the hot glue should go:


Place hot glue around the inner edge of the circle you just traced and place a toilet roll circle on top. Hot glue sets really quickly, so you will only be able to do one side at a time:


Next, hot glue your other circle onto the other side of your toilet roll circle using the same technique:


Finally, wrap your ribbon or ric rac on to your ribbon storage reels:


Ta-da! You're finished!