
My one concern was the storage of the light box, so I decided to make it collapsible so I could put it up and take it down as required. My light box is quite large with each piece of foam board measuring 594mm x 841mm x 10mm. As not everyone needs one this big (I'm not sure I even do yet!), I have made generic instructions for you to follow regardless of the size of foam board you are using.
You will need:
5 x pieces of foam board.
A Pencil
A Ruler and measuring tape
A Sharp cutting knife
A Cutting mat
Instructions:
Take your 5 pieces of foam board and place them on a large surface. On the back of the board (where the barcoded sticker telling you the size of the board is), mark each board so that you know where it is to fit in the box (eg. Left, Right, Back, Top and Floor). Note: These marks face the outside of the box, not the inside:
 Put the 'floor' foam board to the side as it does not require any modifications.
Next, take your ruler and mark the following lines on each of the corresponding pieces of foam board (click on the image to enlarge). These lines should be a ruler length in from each of the edges (which is roughly an inch):
 You should end up with something that looks like this (the picture below is of the 'right' board):
 This next step is a little hard to explain, so you may be best to look at the picture below. Basically, once you have ruled your lines you want to measure 2inch increments along each of the lines, starting from the bottom or side of the 'inch x inch' square in the corner of each of the boards. You then want to shade each second 'notch' in. You will need to include the 'inch x inch' square in the shading, as below:
 Next, carefully cut the shaded 'notches' out:
 Once done, slot the pieces together:
 The finished light box should look something like this once you sit it on the 'floor' board:
 You can cut the excess off the side pieces if you like. I chose to leave them on in case I find that I need to extend the 'top' panel a little.
To use the box, place your light at the edge of the box facing the wall, like so:
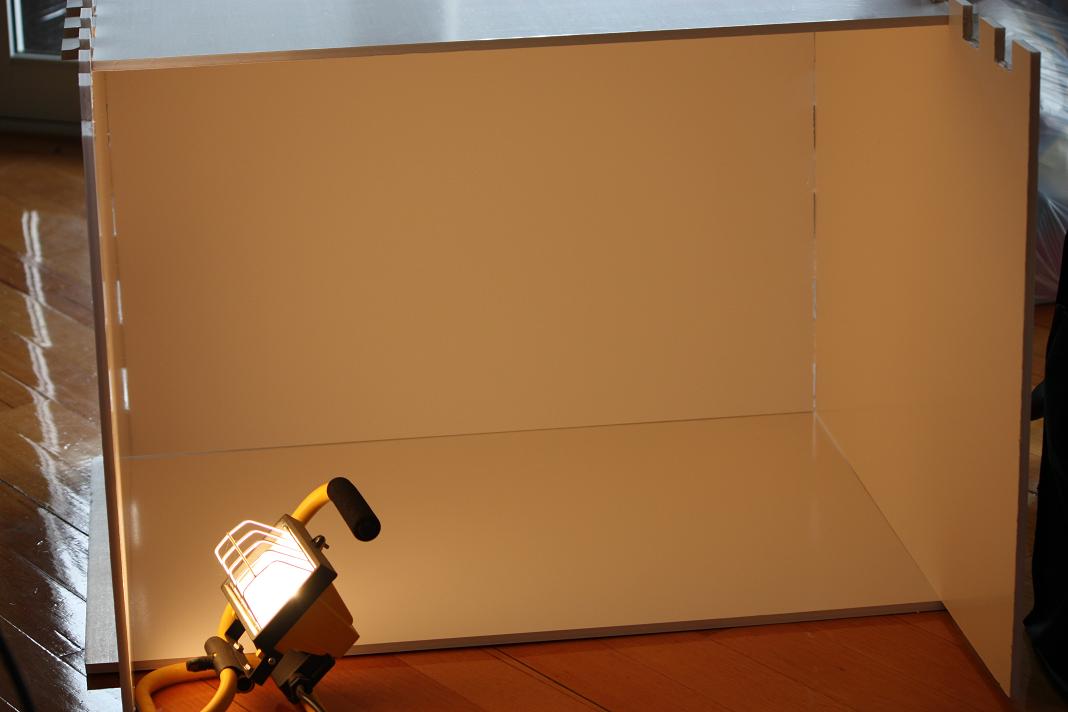 Ideally you would have two lights (one on each side) but our other lamp was too high for me to reach! Placing the lights towards the side of the box makes the light bounce off each of the surfaces better, which results in more light to enable great photos!
I am not too worried about the 'line' between the bottom of the 'back' panel and the 'floor' panel as I plan on using scrapbooking paper or fabric under the objects I am photographing.
If you do happen to need a seamless background, simply buy a piece of poster board the width of your box (and long enough to cover both your 'back' panel and your 'floor' panel), cut notches in the board to match the notches in the top of the 'back' panel and slot the poster board in at the same time as you put the 'back' panel on.
A while back I took a picture of a 'naughts and crosses' board on a day when the weather was horrid:
 Here is a picture of the same board in the light box, using a 240 Watt Halogen Work light inside the box. A pretty big difference, hey!:
 Apparently you can buy 'daylight' globes which produce a more natural light, so I will be having a look for some of those on the weekend. Now that I have the light box, I have no excuse for taking bad photos!
If you have any questions about this tutorial, please let me know.

I have a light box that is made of the same thing but taped together! What a monstrousity to store - now I know just how to modify it so it stores more easily! Thanks so much!
ReplyDeletethis is great! Thanks for the tutorial. I think i could actually make this. I just have one question. Where does the light go? Do you set it in front of the box, or did you make a hole in the top to shine it down from the top? I'd love it if you could let me know how you do it.
ReplyDeleteHi Brenda,
ReplyDeleteI have updated the tutorial to answer your question. The lights should be inside the box, facing the wall so that the light bounces off the white surfaces. I hope this helps!
Fantastic idea! Where do you buy foam board?
ReplyDeletevery clever! thanks for sharing.
ReplyDelete