skip to main |
skip to sidebar
This week for my craft space revamp, I made an inspiration pot. Basically, it is a teapot full of inspiration. Still confused? Well let me explain.
You Will Need:

A teapot
Methylated spirits
Cotton Balls
A permanent marker
Instructions:
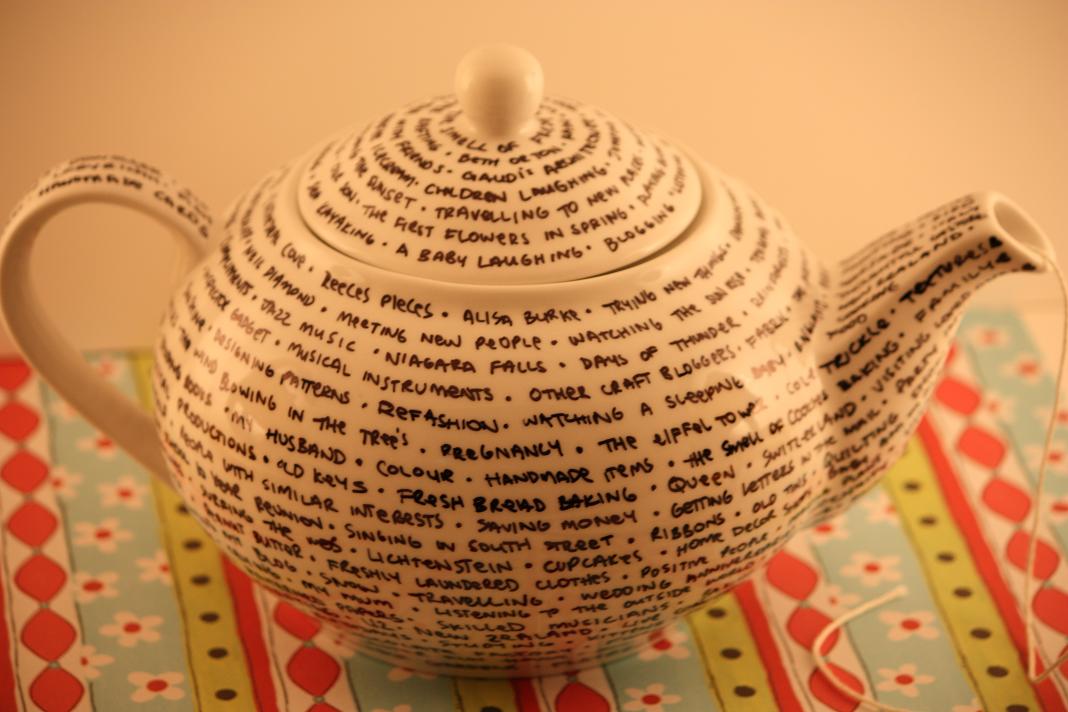
First you take a teapot and clean it down with methylated spirits (using the cotton balls). Then you get a marker and write all of the things that inspire you (or have inspired you) on the side, like this:
 I used a standard permanent marker (a sharpie) as my teapot is simply for decorative purposes only. If you're wanting it to withstand lots of handling, you may need to look at a marker designed specially for ceramics.
So what sorts of things inspire me? Well all sorts of things - music, traveling, reading people's blogs, my family...the list goes on and on.
My inspiration pot is going to be used to store my string, so that I don't lose it. I have threaded the end of the string through the spout to make it easy to dispense:
 Don't be fooled by how easy this looks. It will take you HOURS to think of enough things that inspire you to fill all of the sides lol!
After spending so long on it, I am pleased to report that it actually serves it's purpose. I reread it a couple of hours after I finished it, and boy was I inspired!
This morning when I woke up I was strangely motivated, which is quite an accomplishment since the morning started at 4.30am.
I started thinking about my blog and all of the things I could do with it, which lead me to think that I should have a GIVEAWAY.. because everyone loves free stuff, right?
So, once the number of followers for my blog hits 50 I will indeed be giving you lovely readers the chance to win something. I'm not sure what, but I promise there will be something!
If you like what you see on my blog make sure you become a follower. To those of you that are already followers... thanks for sticking with me this long!
One of the worst things about winter is the lack of natural light as it makes photographing things terribly hard. I had a particularly difficult time photographing the sock owl mobile the other day, so I decided to make a light box to enhance the quality of the photos I am taking.
My one concern was the storage of the light box, so I decided to make it collapsible so I could put it up and take it down as required. My light box is quite large with each piece of foam board measuring 594mm x 841mm x 10mm. As not everyone needs one this big (I'm not sure I even do yet!), I have made generic instructions for you to follow regardless of the size of foam board you are using.
You will need:
5 x pieces of foam board.
A Pencil
A Ruler and measuring tape
A Sharp cutting knife
A Cutting mat
Instructions:
Take your 5 pieces of foam board and place them on a large surface. On the back of the board (where the barcoded sticker telling you the size of the board is), mark each board so that you know where it is to fit in the box (eg. Left, Right, Back, Top and Floor). Note: These marks face the outside of the box, not the inside:
 Put the 'floor' foam board to the side as it does not require any modifications.
Next, take your ruler and mark the following lines on each of the corresponding pieces of foam board (click on the image to enlarge). These lines should be a ruler length in from each of the edges (which is roughly an inch):
 You should end up with something that looks like this (the picture below is of the 'right' board):
 This next step is a little hard to explain, so you may be best to look at the picture below. Basically, once you have ruled your lines you want to measure 2inch increments along each of the lines, starting from the bottom or side of the 'inch x inch' square in the corner of each of the boards. You then want to shade each second 'notch' in. You will need to include the 'inch x inch' square in the shading, as below:
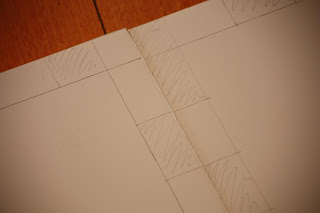 Next, carefully cut the shaded 'notches' out:
 Once done, slot the pieces together:
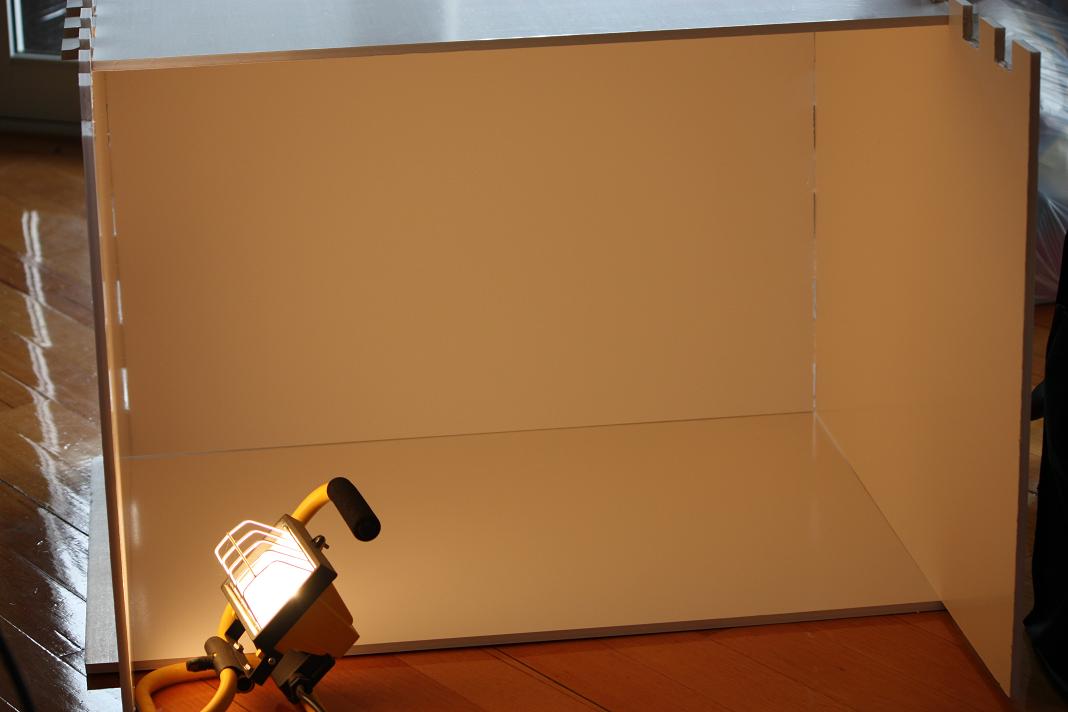
 The finished light box should look something like this once you sit it on the 'floor' board:
 You can cut the excess off the side pieces if you like. I chose to leave them on in case I find that I need to extend the 'top' panel a little.
To use the box, place your light at the edge of the box facing the wall, like so: Ideally you would have two lights (one on each side) but our other lamp was too high for me to reach! Placing the lights towards the side of the box makes the light bounce off each of the surfaces better, which results in more light to enable great photos!I am not too worried about the 'line' between the bottom of the 'back' panel and the 'floor' panel as I plan on using scrapbooking paper or fabric under the objects I am photographing.
If you do happen to need a seamless background, simply buy a piece of poster board the width of your box (and long enough to cover both your 'back' panel and your 'floor' panel), cut notches in the board to match the notches in the top of the 'back' panel and slot the poster board in at the same time as you put the 'back' panel on.
A while back I took a picture of a 'naughts and crosses' board on a day when the weather was horrid:
 Here is a picture of the same board in the light box, using a 240 Watt Halogen Work light inside the box. A pretty big difference, hey!:
 Apparently you can buy 'daylight' globes which produce a more natural light, so I will be having a look for some of those on the weekend. Now that I have the light box, I have no excuse for taking bad photos!
If you have any questions about this tutorial, please let me know.
Well, here it is... the finished egg carton organiser:

And here it is all stocked up:

For those of you with a keen eye and who used to watch cartoons in the 80's, yes, that is a Danger Mouse symbol on the 'inventory listing' card on the lid of the organiser. Why you ask? Well... why not? I used to love Danger Mouse as a kid and now every time I open up my organiser I will think about how awesome that cartoon was.
Anyway, since my photo sucks, let me tell you a bit more about the inventory listing card. Obviously, there are 12 holes in which to store items, so I wrote the numbers 1-12 on the bottom of each of the holes (where the eggs usually sit) and then on the inventory listing card I wrote the item that is stored in that hole. The theory is, that if I notice spot number '6' is empty, I can look at the inventory listing card and know that I need to buy thumbtacks.
The thing that surprised me most about this organiser is how sturdy it ended up being. I'm not saying you could drive your car over it and it would survive, but it is certainly a lot more stable than it was in it's original form.
Anyway, I am working on another one at the moment so that I can write up a tutorial for all of you good people, so make sure you pop back in later in the week if you want to make one of your own!
Well today our son (who from now on, for the purpose of this blog, will be known as Little Snicker) turned 11 weeks old. He no longer has that look of a newborn and is definitely beginning to show us little snippets of his personality.
Here is a picture of him taken this morning while looking at the sock owl mobile:
 The things I have learned this week are:
It is important to keep taking your vitamins - I stopped taking mine for a week, only due to the fact that I ran out and I couldn't be bothered going to get any more. Within 3 days I was feeling a little rough around the edges, but I couldn't work out why. By the end of the week I felt terrible.. like I was about to come down with the mother load of all illnesses. So, naturally, I went and got some vitamins. Within 2 days I was back to normal. Lesson learned.
You pass on the bad as well as the good - For the past week Little Snicker has been stropping out a lot during feed times. During one of these little strops I found myself saying "Wow, he reminds me of myself right now". It's a hard, cold truth that you don't just pass your good traits through to your offspring, but also some of the bad.
When you need it most you are rewarded - I have been feeling a bit flat of late. Today I felt particularly *blergh* and had a major meltdown over something stupid. Not 10 minutes later, I heard Little Snicker stirring in his cot so I went in to get him before he started screaming the house down. Imagine my surprise when he didn't cry, but instead gave me the biggest grin I have ever seen. It simply melted my heart.
Another thing that melted my heart today... seeing Little Snicker holding onto his daddy's finger for dear life while they were playing:
 Ahh too cute for words!

 I used a standard permanent marker (a sharpie) as my teapot is simply for decorative purposes only. If you're wanting it to withstand lots of handling, you may need to look at a marker designed specially for ceramics.
 Don't be fooled by how easy this looks. It will take you HOURS to think of enough things that inspire you to fill all of the sides lol!