Tuesday, June 15, 2010

And I'm back....

I am back, but I have to admit I am struggling. I took two weeks off to restock the Etsy store and all that I managed to finish off was one tag blanket... that's all (and I haven't even put it in the store yet!)

So why am I struggling? Well to tell you the truth, I'm really not sure. I just can't seem to find the motivation to do anything and a lot of the people I talk to are saying the same thing. Perhaps it's just that time of year where everyone falls into a slump or perhaps it's just a case of the less you do, the less you want to do?

I have been feeling so unmotivated I have even been toying with the idea of shutting down the blog. In all honesty though, I don't think that will help any... I think it would just result in me doing even less than I am already doing.

Maybe I'm just being a bit hard on myself. While it is true that I have only finished the one tag blanket, it is also true thatI have almost finished enough owls for three mobiles:

AND I have another 30 (yes, thirty) owls underway:

I think I'll just keep plodding along and get things into the store when I can. In the mean time, make sure you keep popping by for some cool tutorials I have lined up.

Tomorrow I'm going to show you how to turn a onesie into a long sleeved t-shirt!

Tuesday, June 8, 2010

Update

Well I know that I said I would post every couple of days while I was taking two weeks off to restock the Etsy store, but every time I went to blog Little Snicker would look at me with his little eyes, pleading with me to take him for a walk or to read him a book... and who was I to say "no"!


I must say, that I am enjoying the break from blogging. If anyone ever tells you that blogging is easy and doesn't take much effort - don't believe them! It takes more effort than you can ever possibly imagine.

First you need to come up with something to blog about, take photos to support the blog and then actually blog about it. All up, I estimate it would take me between 30 minutes to 2 hours per post, depending on the complexity of the item I'm blogging about.

Anyway, rest assured that I am working away on stuff for the Etsy store when I can and will post again this week to show you what I've managed to get done (which I must admit is no where near as much as I had hoped!)

Tuesday, June 1, 2010

Stocking the Etsy Store

Howdy All! I am just dropping in to let you know that the blog is going to have to take a back seat for the next two weeks, while I work on getting things into the Etsy store (since it's a bit bare at the moment).

What am I working on?

Well I have a pile of socks I am making into owl mobiles:


And I also plan on making some pencil/crayon rolls, a couple of tag blankets and maybe even some tic-tac-toe game sets.

I will still be posting, but probably not every day...and probably no tutorials for the next two weeks
!

Saturday, May 29, 2010

Giveaway Winner

And the winner (as determined by random.org) is comment number 1:
katiegirl said... Count me in. Oh, so cute!!

So, congratulations katiegirl! I will send you an email shortly.

For all of you who missed out, make sure you keep checking back because I plan on having another giveaway in a couple of weeks.

Friday, May 28, 2010

My Craft Space Revamp : Project Bags

Today my aim was to sort out my current projects and blog about that. I thought it would make for a boring post, but I was going to spice it up by dazzling you with some humour along the way. That was the aim.... until I saw this post on the How About Orange blog this morning.

Such a simple idea - drawing on zip lock bags with permanent marker. I had to get me some of those! So that's what I spent an hour or two doing today:

I made a bag for a sewing project:

Complete with a few buttons and a reel of cotton:


A bag for a Christmas project:

See the cute little gingerbread house?:

I also made a bag for my card making projects:

This one has pictures of various events that you could possibly need cards for:


And of course everyone needs a bag for the project you procrastinate about (perhaps I need a few more of these!):

This one has the dictionary definition for procrastination written on it:

The best thing about these bags are that they are reusable. To clean the design off (or to fix up any mistakes you make) just use nail polish remover on a piece of cloth or a tissue and wipe over the design. Too easy!

Snickerdoodle Slice Disaster

You know those craft and cooking blogs that make everything seem effortless and that nothing ever goes wrong? Well... this is not one of those types of blogs.

So, if you want to continue to believe that people who have cooked and crafted for years don't make mistakes, I suggest that you don't read any further. Yesterday I made a doozie of a mistake.... a simple, yet devastating mistake. Let me explain...

I wanted to make this Snickerdoodle Slice for our craft night. It seemed easy enough and I guess it would have gone smoothly if I had just read the recipe correctly. You see, instead of converting 350 degrees Fahrenheit into degrees Celsius... I just cranked my oven to it's highest setting. The fact that my oven dial doesn't even go to 350 degrees should have been the first clue that something was amiss!

Perhaps it was the fact that I was rushing because I knew Little Snicker would be looking for a feed or perhaps it was the fact that I'd only gotten 4.5 hours of sleep the night before. Whatever it was, after 15 minutes in the oven I noticed a smokey haze emerging from the kitchen. This is what had happened to my Snickerdoodle Slice:

Oh dear!

I was going to throw it out, but I figured I might as well attempt to save it.

So I cut the burnt bits off:

Then I made up some butter icing and added some cinnamon to give it a nice colour and flavour:

and spread it on nice and thick:

Then I sprinkled some coconut on the top (because we all know coconut hides a multitude of sins):


How was it?


Well no one complained that it didn't taste any good and Matty took the left overs to work, so it couldn't have been too bad. I think I might try to make it again on the weekend, making sure I read the recipe correctly.

I will be back later on today to share with you what I've been doing in the craft space revamp.

Wednesday, May 26, 2010

Tutorial : Using Watercolour Pencils to Make Cards

Today I needed to make some cards, so I thought I would make a tutorial to show you an easy way to do just that using watercolour pencils.

Anyway, back to the cards... Depending on how detailed your design is, it will take you between 10 - 30 minutes to make.


You will need:

Watercolour paper (It is sold in a pad of around 10 sheets in art supply shops). You can use ordinary card, but if you use too much water when you're painting then it will wrinkle.
Watercolour pencils. These are pencils specially designed to get wet. You can get these from an art supply shop also.
Tracing paper
A Pencil
A fineliner
A fine paintbrush
A glass of water
A piece of plain white paper (for drawing your design on)

Instructions:

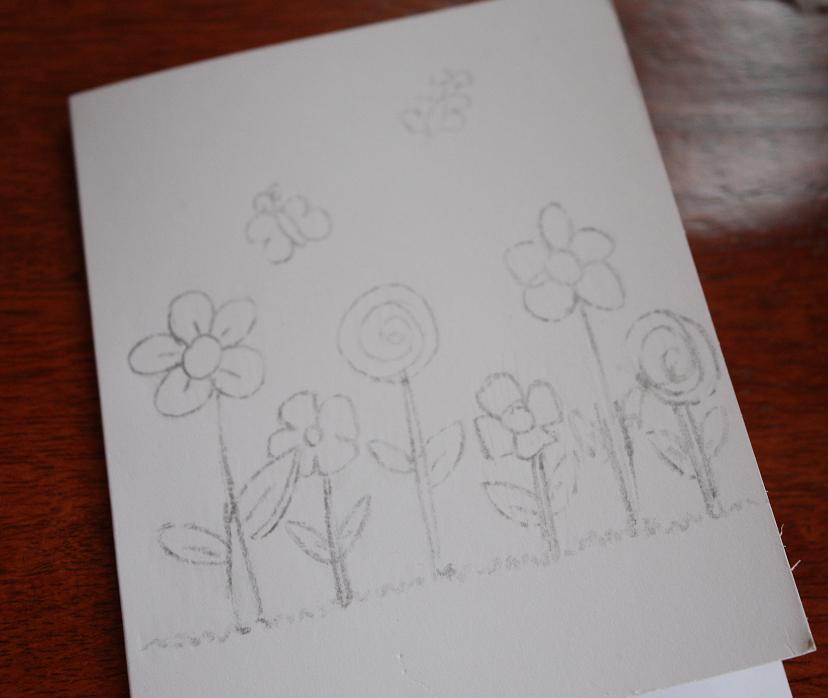
Start by drawing the design you want onto your piece of plain white paper. I suggest folding your paper to the size the front of your card will be. This will ensure that your design will fit just right:


Next, trace your design with a pencil onto your tracing paper:


Turn your piece of tracing paper over and copy the design. This will ensure that when you complete the next step, your design is the right way around:


Take your piece of Watercolour paper and fold it in half to make the card. Turn your piece of tracing paper over and line up the design onto the front of your card. Colour over all of your traced lines heavily, like so:


Once complete, your design will appear lightly on the front of your card:


Next, take your watercolour pencils and roughly colour around the edges of all sections of your design. Remember that the more colour you have, the more 'paint' you will have in the next step:


Take your paint brush and dip it into the water. Paint over the sections that you have coloured, making sure you clean the brush between each colour:

and keep going....


Until you are finished:


It is about this time that I think how terrible my card is turning out and makes me realise that I am certainly no artist. BUT KEEP GOING.. I promise it does turn out alright!

You will need to wait for the card to dry. I usually bust out the hair dryer or sit the card over the central heating vent to speed this part up. Once dry, take your fineliner and draw around the outline of your finished design. Like this:


See, I told you it would all be ok.

Obviously you can cut down on the time the card takes to make by drawing your design straight onto the card with your watercolour pencils. Below is a picture of a card I completed by doing just that:


Better yet, there is no reason why your kids can't help out with this. Why not draw the design and have them paint it for you!