skip to main |
skip to sidebar
This morning while Little Snicker was asleep, I made him this teether from some fabric I had laying around. I thought this might help to stop his latest (unwanted) habit of sucking his thumb:
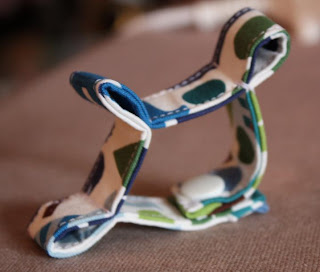
But the design isn't 'quite' right. If he wears it where it's designed to go (around his wrist) he won't have a bar of it as he can still quite easily suck his thumb.
So, it's better suited to be around the back of his hand, kind on near his knuckles. The only problem is that it's then no longer secured to him and that's what I liked most about having it around his wrist. I didn't want to have to worry about him dropping it on the ground and then not being able to have it back because it's germ ridden. I mean I'm all for germs and stuff, but there are germs and then there are germs (like those found on the floor at public food courts).
So, back to the drawing board I go to see if I can get a better design. I'll let you know once I've got it right!
It's been a while since I mentioned the redwork quilt I'm working on for Little Snicker and that's because I lost inspiration. With 6 more blocks to design it just seemed a little overwhelming and the ideas stopped flowing.
So what has motivated me to start working on it again? Well the fact that Christmas is only 178 days away, that's what - scary, I know!
So, here is a sneak peek of the block I am currently working on. It's my favourite by far:
 I am hoping to have the designs finished for all of the blocks by the end of this coming weekend. That way I will just need to concentrate on the stitchery, rather than continually thinking about what the designs will be. Wish me luck!
I could spend hours looking at the ephemera people are selling on Etsy.com. Kind of strange, I know, but it's kind of cool to think about the history behind these items.
I was thinking of purchasing this pack of 100 pieces of ephemera from Cheap Old Crap, when I realised I actually have my own collection of Ephemera right under my desk!
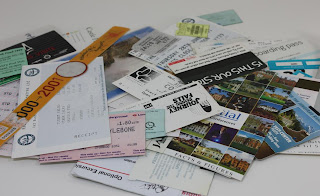 You see, back in 2001 I spent a year living and working in the UK. During this time I traveled to 16 different countries and kept EVERYTHING I came into contact with - Brochures, tickets, postcards etc.
Some of the cool stuff I came across while looking through my collection included:
A rail ticket for Paris:

A ticket for the cog rail journey up Jungfrau mountain in Switzerland:

An admission ticket to see the Footy Show when it was in London:

An entry ticket to the Heineken Museum in Amsterdam:

A ticket to Edinburgh's Hogmanay and a boarding card for the train journey between Edinburgh and Kings Cross Stations:

A post card and ticket for the Maid of the Mist and a ticket for the Niagara Falls Butterfly Conservatory in Canada:
 And an entry ticket to a Jays Vs Angels Baseball game:

And finally, a pile of patches from each of the countries I have visited. These were originally sewn onto my backpack but I pulled them off years ago as they started to fall off and I was worried about losing them:

My original plan was to put all of these tickets and things into a scrapbook, but honestly, I think they're too cool to hide away. So instead, I'm going to think of some projects to use them in so that they don't remain in a box under my desk for the next 10 or so years!
Stay tuned for updates on what I use this stuff for!
I picked up this onesie for $3 a couple of months ago, simply because Matty luuurrvvees Kiss:

Quite clearly it is a onesie designed for wear in the Summer and since it's well under 10 degrees most days here at the moment, Little Snicker isn't getting much wear out of it. With that in mind, I decided to turn it into a long sleeved t-shirt.
Here's how I did it...and it really isn't as hard as it might seem!
You will need:
A short sleeved onesie (to make into the t-shirt)
A long sleeved onesie (to use as a guide for the sleeves)
An old adults tshirt
A ruler
An air erasable marker (or tailor's chalk)
Some Pins
A Sewing machine
Cotton
A pair of scissors
Instructions:
Take your onesie and lay it out flat. Using your air erasable marker, rule a line directly above the top of the leg holes:
 Cut along this line to separate the two pieces. You can discard the bottom part of the onesie as we no longer need it.
 Take your long sleeved onesie and lay it out under the onesie you are making into a t-shirt, like so:
 This next step is a little tricky to explain, so let me tell you a few things first:
- The bottom hemmed edge of the adult's t-shirt forms the long sleeved onesie's cuff, so there is no need for a seam allowance on that end (and it means that we cut down on the amount of sewing we need to do)
- The long sleeved onesie's sleeve is pretty much symmetrical, so it doesn't matter that in the picture below it looks as though the seam of the sleeve we'll be sewing will be on the top. We can just flip it over and it won't effect the end product.
- The long sleeved onesie I am using has sleeves wider than the opening of my short sleeved onesie, so I haven't added a seam allowance. You may need to add a seam allowance depending on the width of your long sleeved onesie's sleeve.
- You need to fold your adult's t-shirt in such a way that ensures you are not using the t-shirt's side seam in any way. If you include that seam where you're going to cut, you will essentially end up with two seams on your sleeve (the seam on the side of the adults t-shirt and the seam that you will sew to complete your sleeve).
Ok, did all that make sense? I sure hope so!
Once you've got your adult's t-shirt folded right, place under your long sleeved onesie (with the edge of your onesie's sleeve against the bottom hem of your t-shirt) and make a mark on the t-shirt to the left of the onesie band, like so (you may need to enlarge the image to see where I've marked):

Next, mark out the shape of your sleeve:

And then cut it out:

Unfold your sleeve and serge down the long edge (the edge opposite to the existing t-shirt seam) so that it doesn't unravel or fray. I'm too lazy to get out the serger, so I just used the serger stitch on my sewing machine:
 Next, fold the sleeve back together with the right sides together and serge along the edge to complete the sleeve. I also run a straight stitch down this side just to ensure it's secure:

Next, turn your sleeve in the right way and pin to your onesie. Ensure that the seam on your sleeve and the seam under the arm of your onesie match up as best as possible:
 Using a straight stitch, carefully sew the sleeve on using the existing seam (or seams in this case) on the onesie as a guide:

You should end up with a sleeve that looks like the one below. Repeat the process to make a second sleeve:
 Next, run a serger stitch along the unfinished bottom edge of your onesie:

Fold the serged edge of the tshirt up approximately 1/4 of an inch and pin:
 Run a double topstitch around the edge to secure:

Once you've done all that, you've finished!
Here is a picture of Little Snicker wearing his long sleeved onesie t-shirt!
 I'm pretty sure he's saying something along the lines of "Thanks mum for making my onesie into an awesome long sleeved t-shirt".... but I could be wrong lol!


