skip to main |
skip to sidebar
I would have to say that the time of the year I find the most enjoyable is when the Christmas baking begins!
This year I started a little bit earlier than usual for a couple of reasons:
- I actually had the energy to do it
- It was cooler on the weekend than I expect it to be for the next couple of weekends
- Our Thursday night craft group have plans of doing a 'communal' craft and decorating gingerbread people for the night this week.
I managed to bake a grand total of 60 gingerbread people, 25 gingerbread stars, 7 mini gingerbread houses and a plain cookie santa sleigh which will be 'pulled' by 9 biscuit reindeers. Not a bad effort if I may say so myself, but I did have to have a nap in the middle of baking it all! Here is a picture of the pile of biscuits:

The recipe I used will definitely be going into the Christmas Traditions Book (which I am going to be working on this week also). Here is a copy of the recipe I used:
Gingerbread
Ingredients
125gm of butter
100gm of brown sugar
1/2 cup of golden syrup
1 egg, separated
2 1/2 cups of plain flour
1 tbs of ground ginger
Method
- Preheat oven to 180°C and cover trays with baking paper.
- Use an electric beater to beat the butter and sugar in a bowl until pale and creamy.
- Add the golden syrup and egg yolk and beat until combined.
- Stir in the flour and ginger.
- Turn onto a lightly floured surface and knead until smooth. Press dough into a disc. Cover with gladwrap and place in the fridge for 30 minutes to rest.
- Once rested, place the dough onto a sheet of baking paper and roll out until approximately 4mm thick. Cut out gingerbread people using a cutter and place on trays roughly 3cm apart.
- Bake in the oven for 7 minutes or until brown (watch carefully as they burn VERY easily). Remove from the oven and transfer to a rack to cool.
The recipe is particularly good as it does not produce a 'strong' gingerbread flavour so it is perfect for the kids!
I will post a photo later in the week of the iced gingerbread people!
Tired! That is the word that sums up how I've felt this week. Work is crazy busy and we have had something on nearly every night for the past week or two! I am planning on sleeping all day on Sunday in an attempt to catch up and feel at least semi-human once again.
Anyway, here is a picture of me from this morning at the 29 week mark:

This week brought about a lot of reflecting on my life and how lucky I am to be here as this time last year, I was in hospital after having a tumour the size of a grapefruit removed from my tummy.
I remember how devastated I was to have thought I only had appendicitis and to wake up after surgery to news that I had not only had my appendix and a tumour removed, but that I had also lost an ovary. I felt incredibly angry towards people who kept telling me that everything would be alright and that we wouldn't have any problems conceiving, as they couldn't possibly know how everything would turn out.
Thankfully, everything did turn out alright and in another 11 or so weeks, we will be welcoming our little baby into the world!
I was so excited to finally find the time to use my spotty muslin fabric that I wrote about in my spring fabric collection post earlier this month. I knew as soon as I saw the fabric that it would be perfect to make a medium weight muslin wrap with, but I kept putting off the project as I imagined that it would take me around an hour to complete. In reality it only took around 20 minutes! I must say that I am really pleased with how it turned out:

The wrap measures 90cms x 90cms and is backed with a piece of white flannalette. Of course, I put on one of the 'boehm baby' labels just to make it look a little more polished.
I figured the wrap would be good to either pop in the nappy bag or the car for those summer nights that turn coolish suddenly, rather than an 'every day use' kind of wrap (which we have plenty of).
Because of the possibility of storing it in the car (and the fact that I really, really, really love the spotty fabric), I figured I should make a coordinating draw string bag as well so that the wrap doesn't get dirty. Here is a picture of the finished wrap and bag:

Because the project was so easy and looks really great, I am tempted to make some more. Maybe if I can get the project list a bit smaller I might do just that!
A couple of weeks ago I found a cute fabric which was white with pale blue and pink stars on it. I thought it would be perfect for the outer of some breast pads since it won't show through my bra, but is still nice and feminine.
There are plenty of tutorials around on how to make breast pads, but the best one I found was on Easy to Entertain's web blog. I particularly liked this one as it has a slight contour which means that (in theory) it should sit on the breast better.
I struggled a bit with what materials to use for the absorbent layers as there seemed to be no hard and fast rule about what was the best. Some people used flannalette, others used old cut up t-shirts and some used worn out bunny rugs. After a while, I made the decision to use white flannalette and some microfleece that was left over from some other craft projects. So long as there is a couple of layers of absorbent material, I guess it doesn't really matter what you use.
Although I used a tutorial, when it came to sewing the pads together I tried a couple of different techniques to find one that suited best. I found that using the sewing machine (as opposed to the overlocker) to make the entire breast pad worked best. I put my machine on a wide, reasonably spaced, zig-zag stitch to sew up the bit to make the contour and then used the 'serger-like' stitch on my sewing machine to sew around the outside. Here is a picture of the finished breast pads:

I am calling these ones my 'round-the-house' breast pads as I plan to make some that have a PUL (waterproof) lining in them for going out. I must say that the pads are more comfortable than I was expecting. Matty and I were mucking around trying them on for size and I stuck one in my bra to show him how it worked. Later on, I spent 20 minutes looking for the missing breast pad before I realised I was still wearing it *sigh*. I guess that's a good thing though!I estimate that they probably cost me under $2 to make the four sets and although the disposable ones aren't overly expensive, I do feel better knowing that I am being kinder to the environment.
Whenever I am asked what I have been up to, I automatically reply with "not much". I am not sure whether it's that I truly believe that I don't really do much at all, or whether I just think that what I have been up to is just too boring for anyone to actually care about. But today, I am going to tell you what I got up to on the weekend and boy does it involve a lot of cute things!
On Saturday we went to my parents house for a bon fire. Matty really enjoys these as it is pretty much a license for him to burn anything he can get his hands on that is lying around the property. I like the fire, but I am not as enthralled by it as Matty is, so I usually take some craft things to do and sit inside with my sisters.
This time was a little different though as my sister Lauren provided me with some entertainment. She had gotten a bunny (and named him Goliath) earlier that day and boy was he cute:

We decided that we needed to find some accessories to make Goliath look even cuter (I did try to get him some reading glasses from the 'teddy bear accessories department in Spotlight, but I couldn't find any!). Mum had a hat that fitted him perfectly though:

Unfortunately for poor Goliath their other Rabbit, Prince, has taken a bit of a liking to him (if you know what I mean), so they have to be separated. I do find it disturbing that Prince is a male bunny also lol....
Anyway, not long after we had finished harassing poor Goliath, mum came in and gave me a present. In my opinion there is nothing better than getting a present when it isn't expected and boy was this present AWESOME:

The school that mum works at had a fundraiser with Biskart cookie cutters and they are so cute! I was extremely excited by these cookie cutters as I was planning on starting the Christmas baking next week and included in the present were cutters for a Santa sleigh, reindeer, a Christmas tree and a miniature ginger bread house! They should keep me out of trouble for a while.
On Sunday I took a trip to Melbourne with one of my oldest friends and had a great day! I headed over to Mathilda's Market in Hawthorn and while I wasn't overly excited by the market itself, I did manage to pick up a set of cute little wooden skittles that I'd been wanting to get for Darth:

They were a LOT cheaper at the market than I had been able to find them online, so the trip was well worth it. The trip was also well worth it for another reason too! I finally found the quilting fabric I had been wanting for Darth's cot quilt (after searching for it for 5 months!):

I must admit that I was buggered by the time I got home yesterday, but it was my sister Jaymee's 16th birthday on Friday so we were having a family dinner and a cake to celebrate.
As I am the chief cake maker in our family, I put together a giant chocolate ripple cake for her on Saturday night. As an extra indulgence I put caramel between the layers as well as cream, so it was particularly decadent. Here is a picture of the finished cake and while it isn't 'cute' as such, it was really quite awesome:

I also got a little bit of craft done in the spare time I had, so I will post some updates on those projects a little later on! I hope you all had a great weekend too!
What a week! One day it's so cold you need the heater on, the next it's a tropical hot wave and you're sweating so much you need to change 3 times a day. Enough with the crazy weather, alright!
I have not been coping well with the heat at all. More so it is the sleepless nights than the actual heat that is taking it's toll, but none the less I am stuffed and glad that this weekend is supposed to be wet and miserable (apart from the fact that our fence probably won't get done again). Here I am this morning, at 28 weeks:

Earlier this week we started our pre-natal classes and while most people told us they would be an utter waste of time, I am pleased to say that both Matty and I found the first one very enjoyable. I guess it's the age old case of "you get out of it, what you put in".
The first class covered general baby care tips, activities to familiarise the group members and a DVD on breastfeeding. I must admit that I was surprised at the amount of effort required in a 'normal' breastfeeding experience. I had thought it would be much easier than it appeared to be!
One thing that did kind of irk me about the class is that they plugged disposables as the 'superior' nappy choice over cloth for 'environmental' reasons, as cloth nappying apparently uses more water than disposables.
It doesn't take much of a google search to find out that isn't the case. If they were plugging them for useability and convenience reasons then I would understand, but recent studies have shown that disposables use 2 litres of water more PER NAPPY (in the manufacturing process) than cloth. Anyway, I'm hopping off the soap box now.
This coming week I get to do the glucose test to check for gestational diabetes. Sounds like fun! Until then though I plan on sleeping a lot and eating my fair share of icy poles if it's hot!
Can you believe that it's only 36 days until Christmas?!?! Like most previous years, I am fairly organised as I REFUSE to do any Christmas shopping (unless absolutely necessary) in December, for a couple of reasons: - Shopping in December makes me spend a lot more money on Christmas due to 'impulse' buys; and
- I just can't hack shopping with sooo many people whose common courtesy seems to disappear in the lead up to Christmas
Apart from the shopping part, I really love Christmas. I love spending time with my family and friends and I particularly love decorating the tree and setting up the advent calendar.
A couple of people have asked me whether I will be making a new advent calendar for this Christmas, but how can I when the one I made last year was so adorable!

My sister and I each made one of these after seeing it in a Christmas Card magazine. We bought a cricut machine and the bags, tags and boxes cartridge from the USA and waited patiently for it to arrive. While we were waiting, we made the tree from a couple of bits of square dowel, painted it white and put our little screws in to hold onto our cute little bags.
Once the cricut machine arrived, we set to work making the bags and covering them with an array of Christmas papers and embellishments. Finally, to finish it off, we went shopping for an ornament to sit on the top. The stand is just a gift box I picked up for $2, with a hole cut in the top to stand the dowel tree in.
The bags are a fairly decent size and fit at least 6 small chocolates in them:

I always try to make sure that I put the same number of each chocolate in the bag so that Matty and I don't fight, although I think this year I may put an extra one in each bag for our baby (which of course I will have to eat!)
So those of you who know me well, know that I am trying to do my bit to save the environment. That means that as a household we are trying to use less paper and plastic products, recycle more and re-purpose items we own to avoid them going into landfill.
A while ago a friend suggested that I join our local Freecycles group as a way of getting rid of items that can't be re-purposed or sold. If you are unfamiliar with Freecycle, it is basically a network of like-minded people working together to give and receive things for free, in order to keep items out of landfill. There are active groups in most larger towns and you can find out if there is one near you by visiting the freecycles site. Once you join (for free) you can make posts for items that you want to get rid of, or items that you want to receive. People have given away horses (not that you would hope they would go into landfill!), jam jar lids, trees from their garden and all sorts of weird and wonderful things.
Yesterday on Freecycle there was a Peg Perego highchair on offer, so I sent an email to the lady to say that I was interested in taking it off her hands. As I was the first person to reply, she said it was mine!
We already have a highchair for use at our house, but I was looking for another one to store at the grandparent's house since we spend a lot of time there. As the highchair was free I had expected it would require some repairs, but I was pleasantly surprised. Here is a picture of it:

The only damage is to the seat cover near where the harness clips in, but it's barely visible:

So now I am feeling pretty happy that I not only saved us some more money (and the more we save the longer I can comfortably stay at home with our baby), but also rescued a perfectly functioning highchair from landfill!
Since my friend's baby, Isabella, turns 2 weeks old on Thursday I thought it was about time to get a wriggle on with making her present. Using the cute spring fabrics I bought a couple of weeks back, I made a start.
I had two patterns to choose from, both I had made myself by tracing around existing bibs that I had. One was designed to slip over the baby's head and the other does up with snaps. I chose to make the one with the snaps, as it is difficult to gauge how big the head opening has to be on the 'over the head' style when you don't have the baby in front of you to test on!
I used a piece of scrap flannelette that was left over from the Modern Cloth Nappy project for the back of the bibs. I was pleased to find that I had enough flannelette left to make the back for 4 bibs (2 for Isabella and 2 for our other friend's baby, Faith) and that the off-cuts may be big enough to use for the breast pad project I'll be tackling later this week (fingers crossed). Of course I used the spring fabrics for the front and they were still as cute as ever!
Here is a picture of the bibs finished:

I would have liked to have put a label on them (similar to how I did for the Baby Shoes & Bibs project), but since Isabella isn't a "boehm baby" it seemed a little silly to whack one of those one them! Ahh well, they are still pretty cute I think!
This past weekend we took a trip to Geelong so that Matty could help his dad get the boat that he's been building onto the trailer, so he could take it to a hobby fair this coming Friday. Since my help wouldn't be needed, I thought this would be a great time to get the Christmas cards finished since they need to be sent out in about two weeks time.
This year I had set myself a challenge - to use up my existing stash of Christmas embellishments and papers, as I had been accumulating them over the past couple of years. Luckily, I had enough paper left over from the Christmas Traditions book to make 15 cards (which is the set number I make every year).
While I had quite a few embellishments, I didn't have enough. So I got a little inventive and used my sister's Cricut machine to cut out the words 'Christmas' and 'Joy'. I then edged each of the letters with a glitter pen to make it stand out a little bit more. I then raised every second letter using mounting tape to add some dimension. Doing this meant that I stuck to my goal of spending very little on the cards this year. Yay!
Anyway, there really isn't too much more to say about these cards. Here is a picture of them finished: Now I just need to write on them all.... Erk!
 Wow - Week 27 already! Where has the time gone?
This week I was introduced to the wonderful world of fluid retention. Temperatures reached 32 degrees and my feet ached, my wedding rings no longer fitted on my middle finger (they were too big prior to falling pregnant) and my sciatica started to play up again. Needless to say, I was not a happy camper! On the upside though I didn't do anything ridiculously silly like I did last week, so it wasn't all bad.
Next Tuesday we start our pre-natal classes, which I am a bit nervous (yet also excited) about. I am not really sure what to expect and whether the classes will even actually help.
Most of all I am worried about the group that we will be in, as I don't have the tolerance to deal with idiots just at the moment. Fingers crossed they all turn out alright.
If I ever, EVER, mention that I am attempting a project that requires gathering again remind me about this project, PLEASE! Between the cot valance and the maternity top, I have spent an estimated 10 hours with my quick-un-pick this week. In fact, I have spent so much time with it that I thought about giving it a name (isn't that sad).
I researched gathering techniques quite extensively before making a start on the cot valance and decided to go with a technique from an antiquated "Nursery Decor" book I picked up a few years back for $3.
Basically, the book advised that the easiest way to gather fabric was to take a piece of dental floss, set your machine to a wide zig-zag stitch and then zig-zag over the cord to trap it beneath the stitches (being careful not to pierce it). There is a tutorial on the Christine Sews website which shows how to gather fabric using this technique.
Once you have sewn the dental floss onto the fabric you wish to gather, you then pull the dental floss from both ends, pin the gathered material to the lining material at regular intervals, and join the two pieces together using a straight stitch. Sounds pretty easy hey? Well it wasn't.
The first problem I encountered was that the book stated to sew the dental floss 1 1/2 inches from the edge of the fabric. That possibly would have worked if your seam allowance was 1 1/4 inches, but I had allowed only for a 1/4 inch seam allowance. What this meant was, that when I sewed the fabrics together it didn't really look gathered - it look more 'tucked' (for want of a better word) as the fabric wasn't gathered enough where I was sewing. So I sewed around the valance pieces with dental floss again 1/2 an inch from the fabric edge. This worked a LOT better.
The second problem that I had was as a result of my own stupidity and the fact it was a 32 degree day. Not once, not twice, but THREE TIMES I sewed one end of the valance to the lining backwards! In the end I said a few choice words, cut the lining in half, turned it over and sewed the two pieces back together again. I figured no one would ever see that anyway since it sits between the cot base and the mattress (luckily I hadn't sewn on the sides yet!):

The third problem was a direct result of the first problem. I had sewn around the valance twice using the dental floss technique, so that meant I had two rows of stitches (a total of 26 metres) to unpick!
Anyway, I am pleased to report that I washed the valance this afternoon and it didn't fall apart! In fact, I am actually really pleased with how it turned out and glad that I didn't just throw in the towel and buy one:

All up this project cost me about $6, so let's say that is a minimum saving of $14! Maybe I will find another project that only requires a small amount of gathering so I can build up my skills in this area, as the technique actually looks quite effective when finished.
Here is a link to the other post on the cot valance:
I have a lovely cot (actually a beautiful cot) set up for our baby, but there is a problem. With the mattress in the 'newborn' position you can see everything in the drawer underneath - yukky poo poo!

A cot valance would fix the problem and cover up the contents of the drawer, however I wanted a plain white one and could only find ones with animals or stripes retailing for over $60!
I managed to find a plain white one for sale online but it looked cheap and at $20 plus postage and handling, it was not a price I wanted to pay (especially since it was also second hand). So, of course, I had a great idea to make it myself - so that's exactly what I indend to do!
On the weekend I rumaged through my fabric stash and found a piece of medium-weight white material with a fine stripe through it - absolutely perfect for the drop of the valance. The problem came, though, looking for the material that would act as the lining (the bit that sits between the cot base and the mattress). There was nothing at all suitable in the fabric stash!
Off I went to Lincraft and had a look on the remnants table to see if there was something there. I was about to give up when I stumbled across a piece of terralene curtain material. A lot of the valances I had seen had used a similar mesh type fabric so that it was breathable, so I thought that this would suit perfectly.
Armed with the fabric, I am now ready to make a start on the valance. I am both excited and scared about tackling this project as it uses a new technique I have not attempted before - gathering! The last time I attempted to gather some fabric it was a disaster to say the very least. But these days I have more patience, so I am hoping that will be enough to get me through to the end of this project.
Here is a link to the other post on making the cot valance:
Well after another unexpected windfall, our pram savings fund is almost to the required amount of $560! Last night while we were out for dinner with my parents, my step-mum advised that she would like to donate $200 to the fund. My little peepers nearly fell out of my head!
With this generous donation we only have $42.99 left to raise. As it is going to be 33 degrees here this coming Saturday, I might hold off on the garage sale and instead list a couple of items on eBay to raise the remaining funds.
Wish me luck!
Last weekend it was hot - stinking hot! Up until then I had found my maternity wardrobe to be lacking , but workable. In the heat however, I realised that I don't have enough skirts and I certainly don't have enough maternity tops or tshirts.
After having such success on the skirt refashion, I thought it was time for a new challenge - Sewing a maternity top using the shirring technique. Here is a picture of the top completed:

A while back I had attempted to shir a piece of material and failed miserably. After winding the shirring elastic onto the bobbin it would unravel when I put it into the machine, which meant that the elastic wasn't tight enough to shir. I tried 'googling' for solutions to this problem, but came up empty handed. It wasn't until I was talking to mum about it that we realised I had been using a generic bobbin and sure enough when I used a legitimate 'Singer' bobbin instead it seemed to work.
First I tried making a top using a tutorial which was quite clearly a dud. They insisted that you didn't need to tie the shirring elastic ends together to secure it and as a result, when I put the top on all of the shirring came undone *sigh*. This meant I spent 4.5 hours unpicking the millions of rows of shirring to start again.
I ended up using a great tutorial from Kuky Ideas and added a tie around the waist as I thought it would look cute (kind of like my baby bump was wrapped up like a parcel!).
All up the top took me around half an hour to make and only cost me about $6 to make. Given the same style of top retails for around $30 at Kmart, I'll have saved myself $24 - yay!. The top is super comfy and perfect to wear over jeans (when it's cooler) or over a skirt. Better yet, I should still be able to wear this top after the baby is born too. Here is a picture of me wearing the top:

The best part about this top, is that I should be able to wear it after the baby is born also!
Well, what is there to say about this week? This week I managed to wash my hair with my face cleaner, crack a raw egg onto my salad instead of in the frying pan and then to top it off, I lost my electric beaters for 2 hours only to find that I'd put them in the fridge (for safe keeping I told myself!). Anyway, here is a photo of me from today:
As you can see I've chunked up a bit this week and about time I say! Everyone keeps asking me if I am sick of myself yet and I don't have the heart to tell them that, apart from the incessant kicking going on in my belly, I still don't even feel pregnant! Let's wait until the heat sets in though and I am sure it will be a different story.
Another one of our friends gave birth this week to a beautiful little girl, Faith Edith. Matty and I are getting really excited to think that in another 3 months it will be us holding our tiny eenie weenie baby! I am not sure whether I am coming to terms with the labour component of having a baby (that's the part that has always freaked me out) or if I'm still just living in denial that when it happens it will be all rainbows, fairy floss and butterflies, but I am feeling relatively calm about getting this baby out. I mean it can't stay in there forever, right?
This weekend we are planning to get some more things done around the house. I am pretty keen to get the nursery completed so that it's one less thing to worry about, but we'll see how it goes.
I have got to admit that I am hesitant about this project. In theory it should work fine, but I am not sure how it will withstand daily wear and tear or how well it will seal the sandwich in to stop it from drying out. I guess there is only one way to find out - let's try it!
I stumbled across a tutorial on the French Sleep Deprivation Study Blog whereby fabric scraps and old chip packets are recycled into sandwich bags, essentially saving the environment not only by eliminating the need for gladwrap but also by reusing items so that they don't end up as landfill. Sweet!
Here are the materials I used for the sandwich bag who, from this point forward, will be known as Gerald:
- A grain waves bag (mylar)
- A piece of vlisofix
- A piece of fabric from my fabric stash
- Some elastic I found laying around in the bottom of my sewing box
- A button from my button collectionThe tutorial was nice and easy to follow, however in hindsight I would have:
- Make Made Gerald approximatley 0.5cms wider, as it was a little bit hard to squash the sandwich in him (however, you wouldn't want it too loose either or your fillings might fall out!)
- Attached the elastic when sewing the outside together as the instructions say to sew the elastic on last, which results in the outer stitching being a little bit messy
- Coordinated my fabric, thread, elastic and button choices a little better. Let's face it, Gerald is pretty damn ugly!
Here is a picture of Gerald just after he'd been made:
 And here he is again, this time with a sandwich in him!

The plan from here is to see how the sandwich is at lunch time tomorrow to ascertain whether the mylar is enough to stop the sandwich from drying out. Then we will give him a wash and see how he does with that (and what the drying time is like) and then, provided everything looks ok, my friend Kate is going to give him a good trial run with her sandwiches next week.
Once we know how Gerald performs under pressure, we'll make him some friends!
Something very exciting is happening at our house - our front fence is being built! While this might not seem like exciting stuff, it is a monumental event in our lives due to the amount of crap that we had to go through to get it to this stage.
The fence journey began in January of this year with submitting the permits to the local council. In true local council style, they kept sending the forms back saying that they were incomplete (despite us checking when we dropped them in that everything they needed was there).
Then the calls started where they would claim that we still owed them money and as such they could not issue the permits. After waiting on hold for 20 minutes each time, they would magically find that we had paid the money, apologise profusely and tell us the permits were on their way. By the time I got my fourth call from a council representative requesting money, I was losing my patience. None the less the permit was issued at the end of April.
By then it was too wet to even think about putting up the fence, so we had to wait patiently for the weather to improve. While the weather has been good for a couple of months now, dad had been waaaay to busy to come and help dig the fence posts with his fancy post hole digger.
Well yesterday the fence posts finally went in (they are a lot longer than the actual height of the fence so need to be sawed off, but that doesn't happen til later):

Luckily, I hadn't ordered any of the other materials for the fence as there was a slight hiccup with the plans. We had to alter the plans, which then changed the length of the wood that we required for the horizontal slats *phew*... that could have been a costly mistake if I had have ordered it all!
We decided we would build our fence ourselves to save ourselves a lot of money, so while I still think we are quite a way off having the fence up at least the foundations are there!
Today while Matty and my dad were putting up the posts for our front fence, I set to work on the table runner again. I had been doing a bit here and there, but decided that I really needed to get it done today!
Now some of you might not know, but I don't usually complete a craft project without some form of hiccup and today was no exception. I ran out of liquid nails with just 9 pebbles left to glue on!

I went outside to tell Matty about my latest misfortune, so we could have a bit of a chuckle, when dad came to the rescue and said that their might well be a tube in the bottom of his tool box.
After a bit of rummaging through the copious amounts of crap he had in there, I found a tube that look like it had been purchased in the late 70's - but it did the trick and that's the main thing.
Here is a picture of the table runner completed:
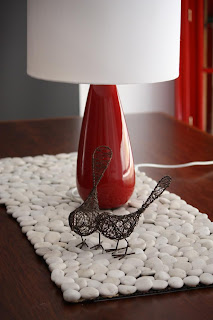 All up I saved about $120 by making the table runner myself. Here are the links to the other posts on the completion of the pebble table runner:
Only after a couple of days of really hot weather, it became apparent that I am not going to have enough summer maternity clothes to get me through until February *sigh*. I had been looking around for some maternity skirts but was waiting for a sale as I refuse to pay $40 for a skirt I am only going to be wearing for a short time. A friend suggested I take a look at a blog she reads on Wardrobe Refashion.
Now, I am the first to admit that my sewing skills are definitely NOT in the 'advanced' or even the 'intermediate' category. They are probably somewhere in between the 'What is this sewing machine device you speak of?" category and the 'beginner' category, but I can sew straight lines which I guess is the important thing. And let's face it. No one ever learned a new skill by sitting around whinging about not being able to do it.
So on Saturday morning I got up early, went to the op shop and found myself a non-maternity skirt to 'refashion': As the skirt was a size 18 and way, way, way too big, I started by unpicking the side seams so it could be taken in a couple of inches. After removing the zip, I unpicked the top band so that it could be replaced with a stretchy material, which is essentially what makes a skirt 'maternity wear'. I then cut off a couple of inches off both sides of the skirt (using a skirt that fits perfectly as a guide) and sewed it all back up.
As the tummy sits a bit lower during pregnancy, I cut a slightly rounded section out of the front of the skirt before attaching the stretchy top band. I was going to go to Lincraft and get some brown stretchy material to use for the band, but the main purposes of wardrobe refashion are to save money and to reduce the amount of landfill, so I decided to use a couple of scrap bits of black stretchy material I had left over from another project.
All up I think it took me around an hour to make, but I think I could do it quicker next time, now that I understand what is required. Here is a picture of the finished skirt:
 All up I saved myself $33 - and learnt some very valuable skills in the process!


